Need to know information before you apply for mule deer and antelope in the state of Wyoming for the 2026 application season

Item |
Resident |
Nonresident regular |
Nonresident special |
Application fee |
$5 |
$15 |
$15 |
Deer preference point |
N/A |
$41 |
$41 |
Antelope preference point |
N/A |
$31 |
$31 |
Full priced deer |
$42 |
$374 |
$1,200 |
Reduced price deer |
$22 |
$34 |
N/A |
Full priced deer (youth) |
$15 |
$110 |
$1,200 |
Reduced price deer (youth) |
$14 |
$19 |
N/A |
Full priced antelope |
$37 |
$326 |
$1,200 |
Reduced price antelope |
$22 |
$34 |
N/A |
Full priced antelope (youth) |
$15 |
$110 |
$1,200 |
Reduced price antelope (youth) |
$14 |
$19 |
N/A |
Item | Resident | Nonresident regular | Nonresident special |
Application fee | $5 | $15 | $15 |
Deer preference point | N/A | $41 | $41 |
Antelope preference point | N/A | $31 | $31 |
Full priced deer | $42 | $374 | $1,200 |
Reduced price deer | $22 | $34 | N/A |
Full priced deer (youth) | $15 | $110 | $1,200 |
Reduced price deer (youth) | $14 | $19 | N/A |
Full priced antelope | $37 | $326 | $1,200 |
Reduced price antelope | $22 | $34 | N/A |
Full priced antelope (youth) | $15 | $110 | $1,200 |
Reduced price antelope (youth) | $14 | $19 | N/A |
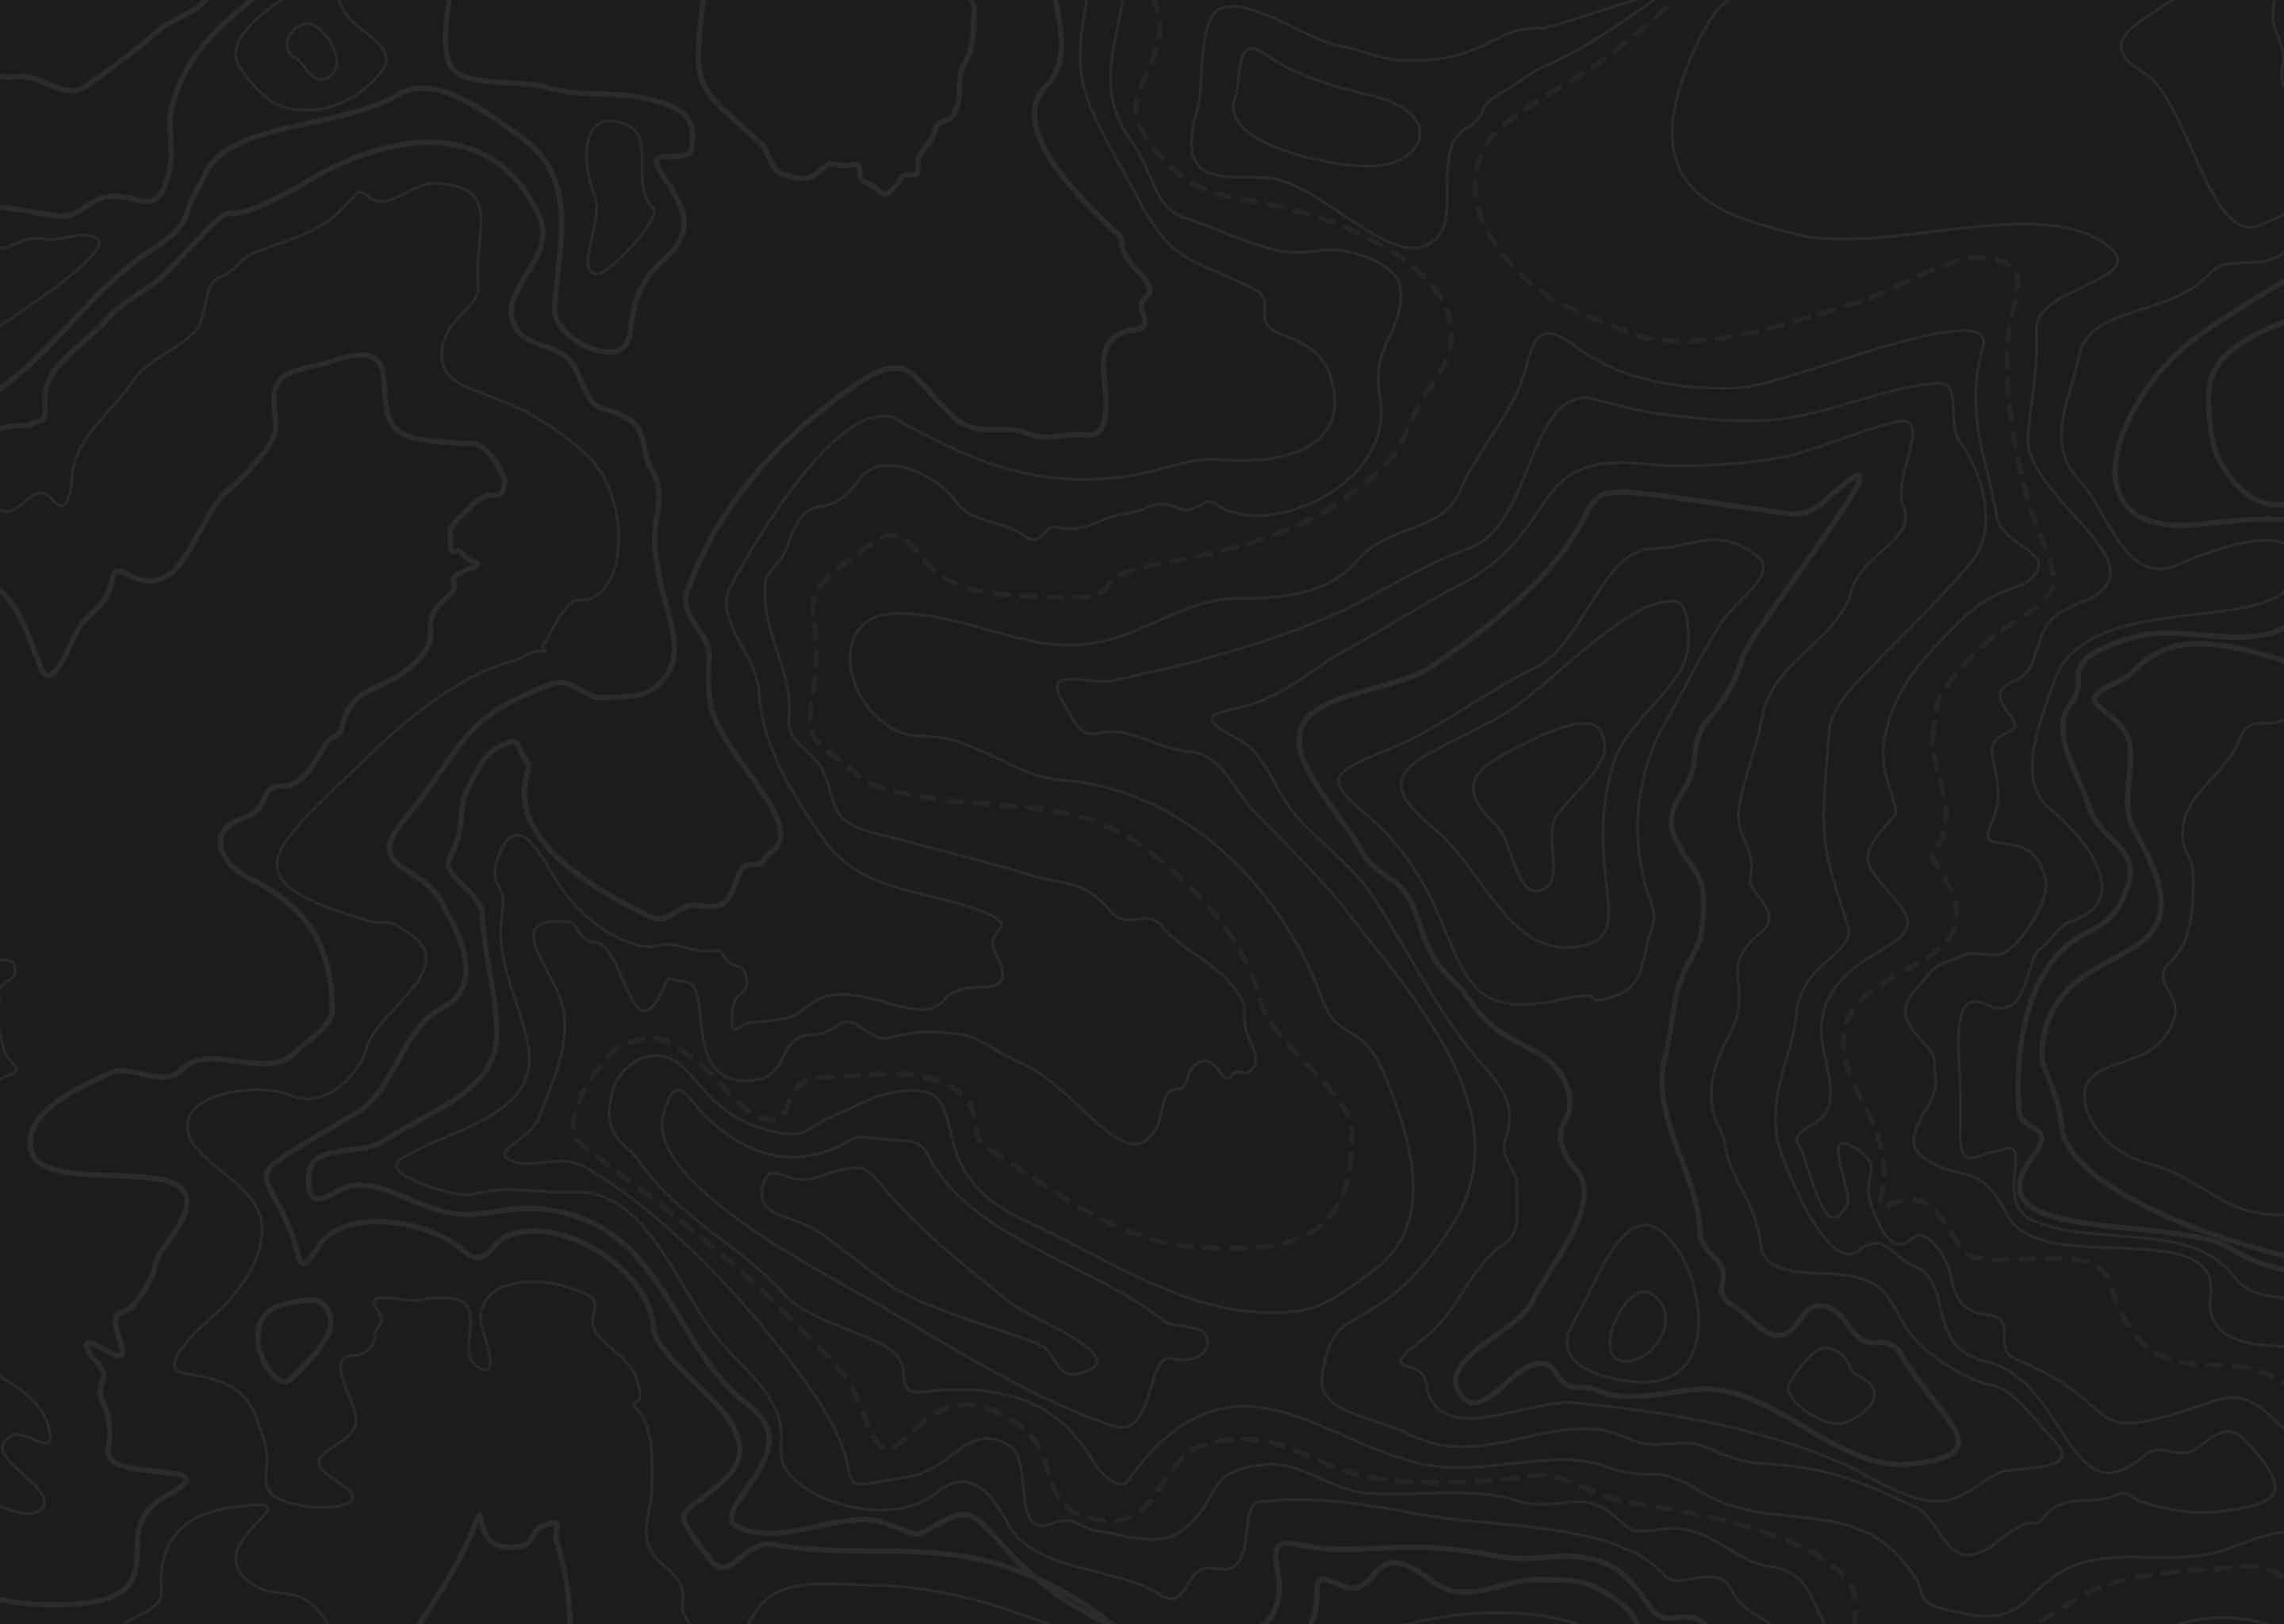
Viewing designated wilderness areas in Wyoming on GOHUNT Maps.
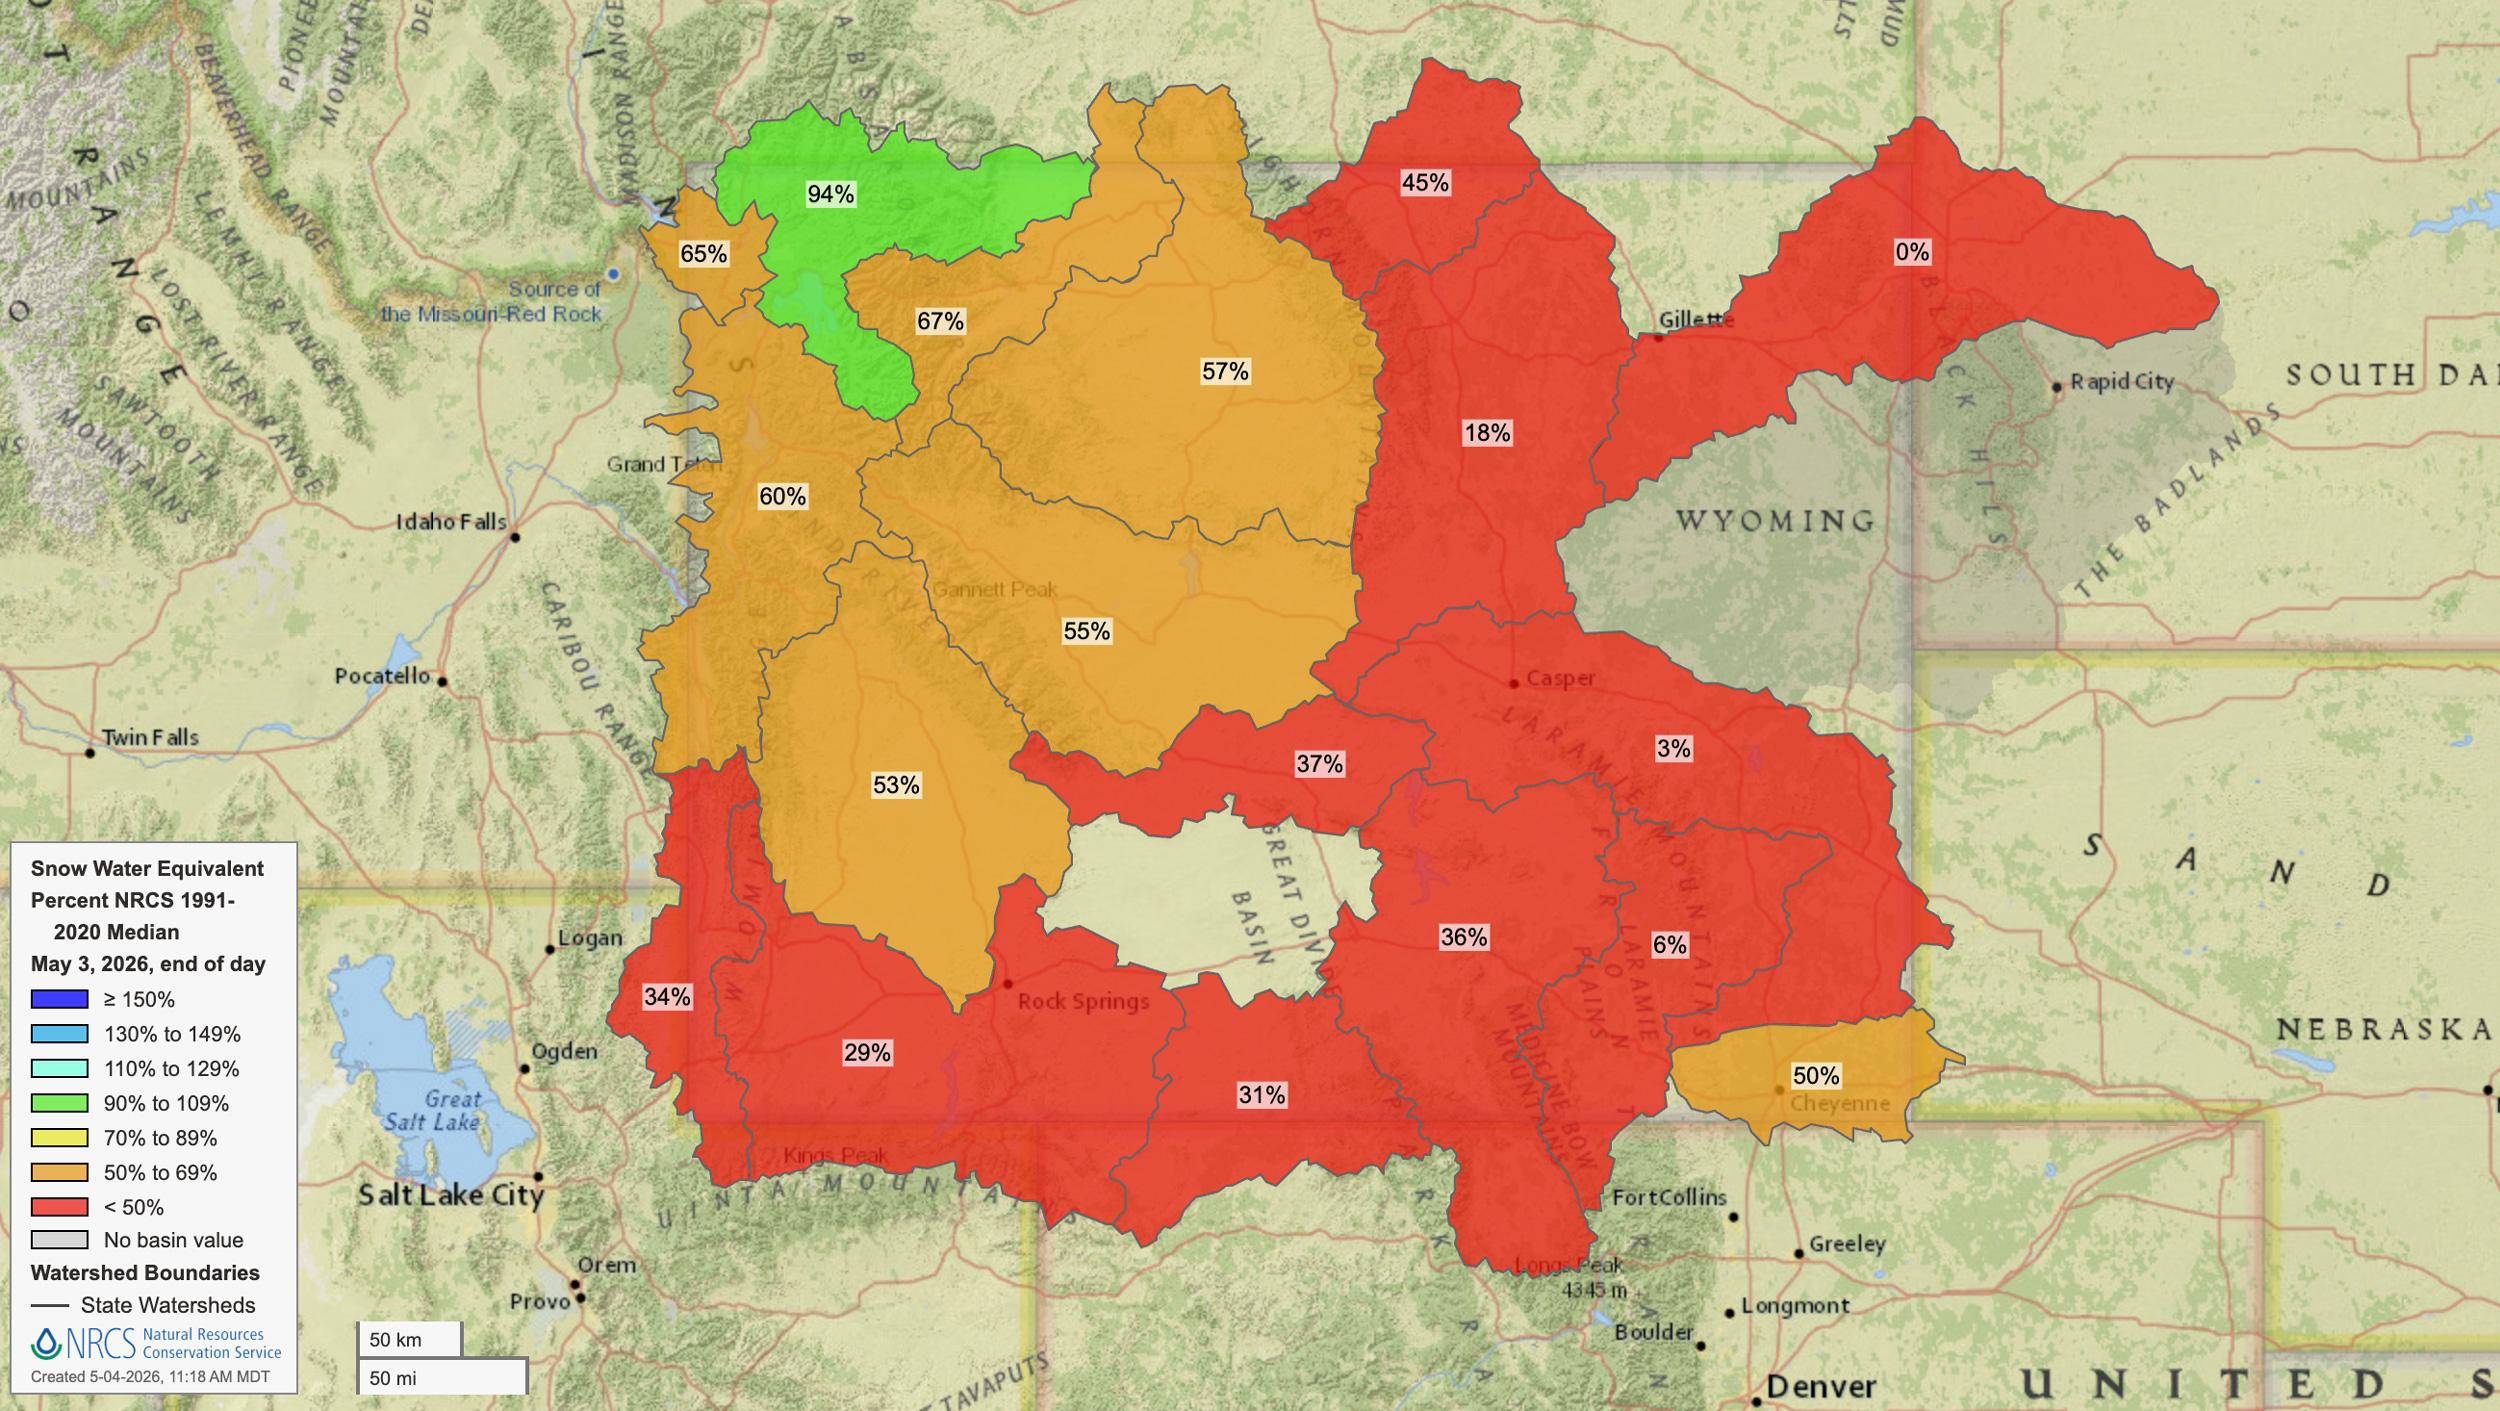
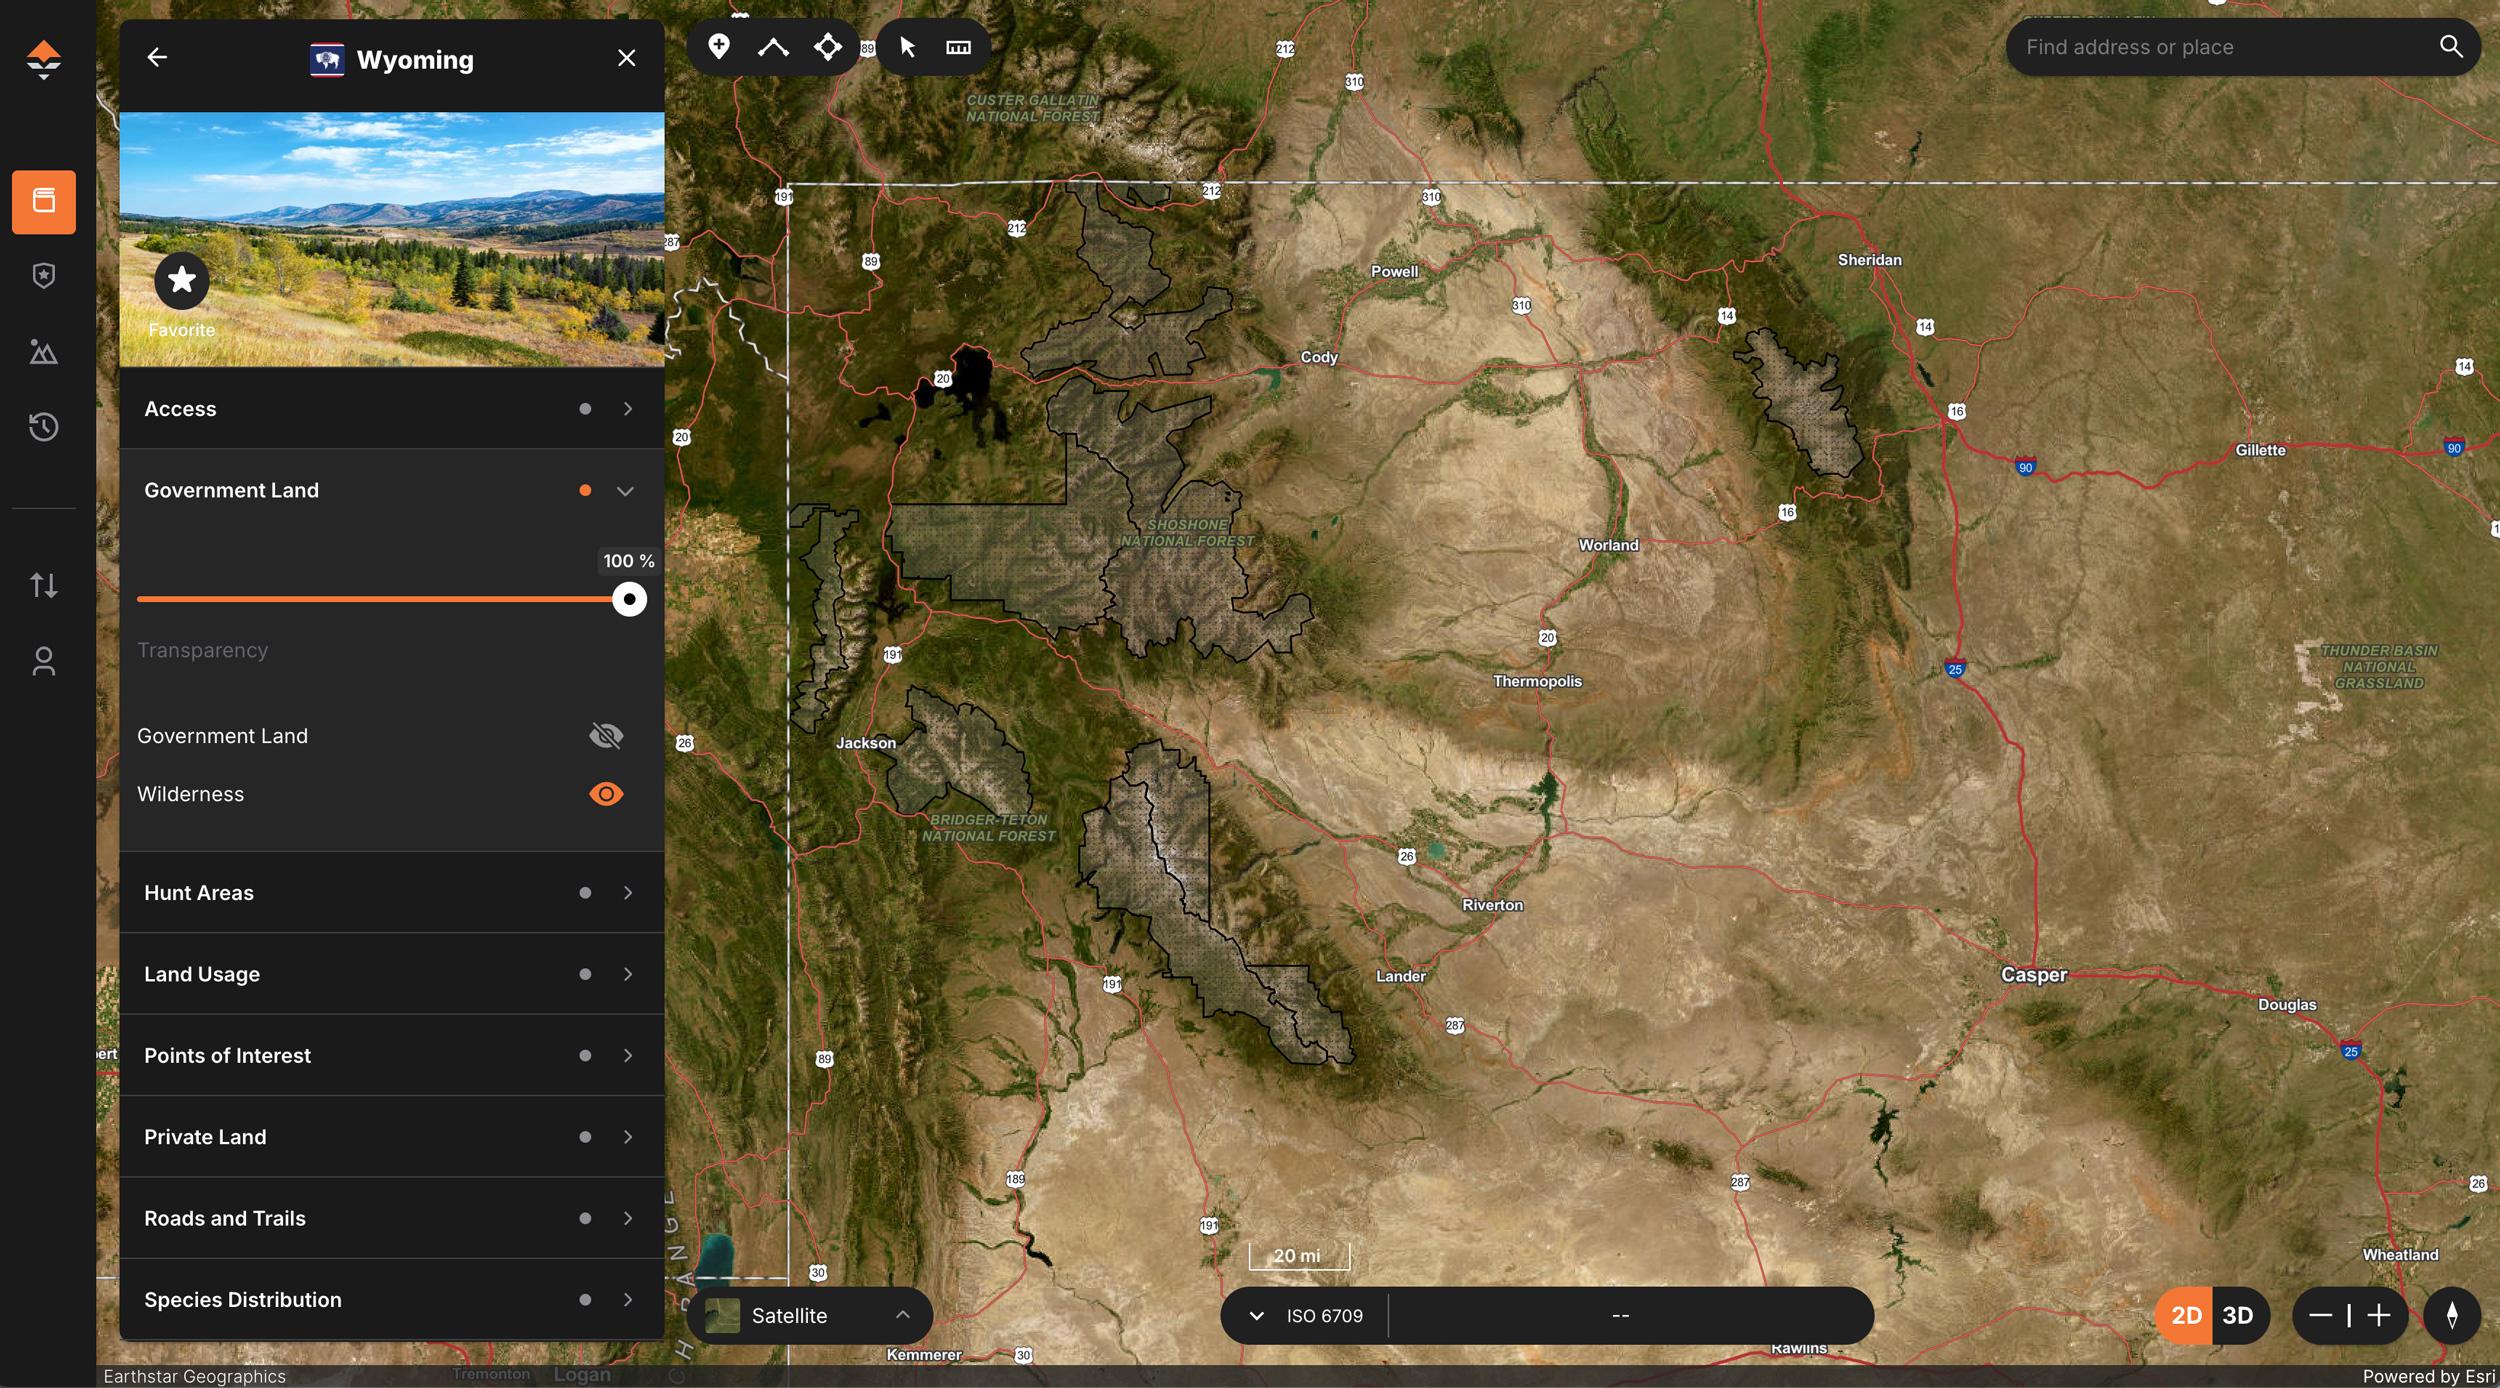
May 5, 2025, Wyoming snow water equivalent map.
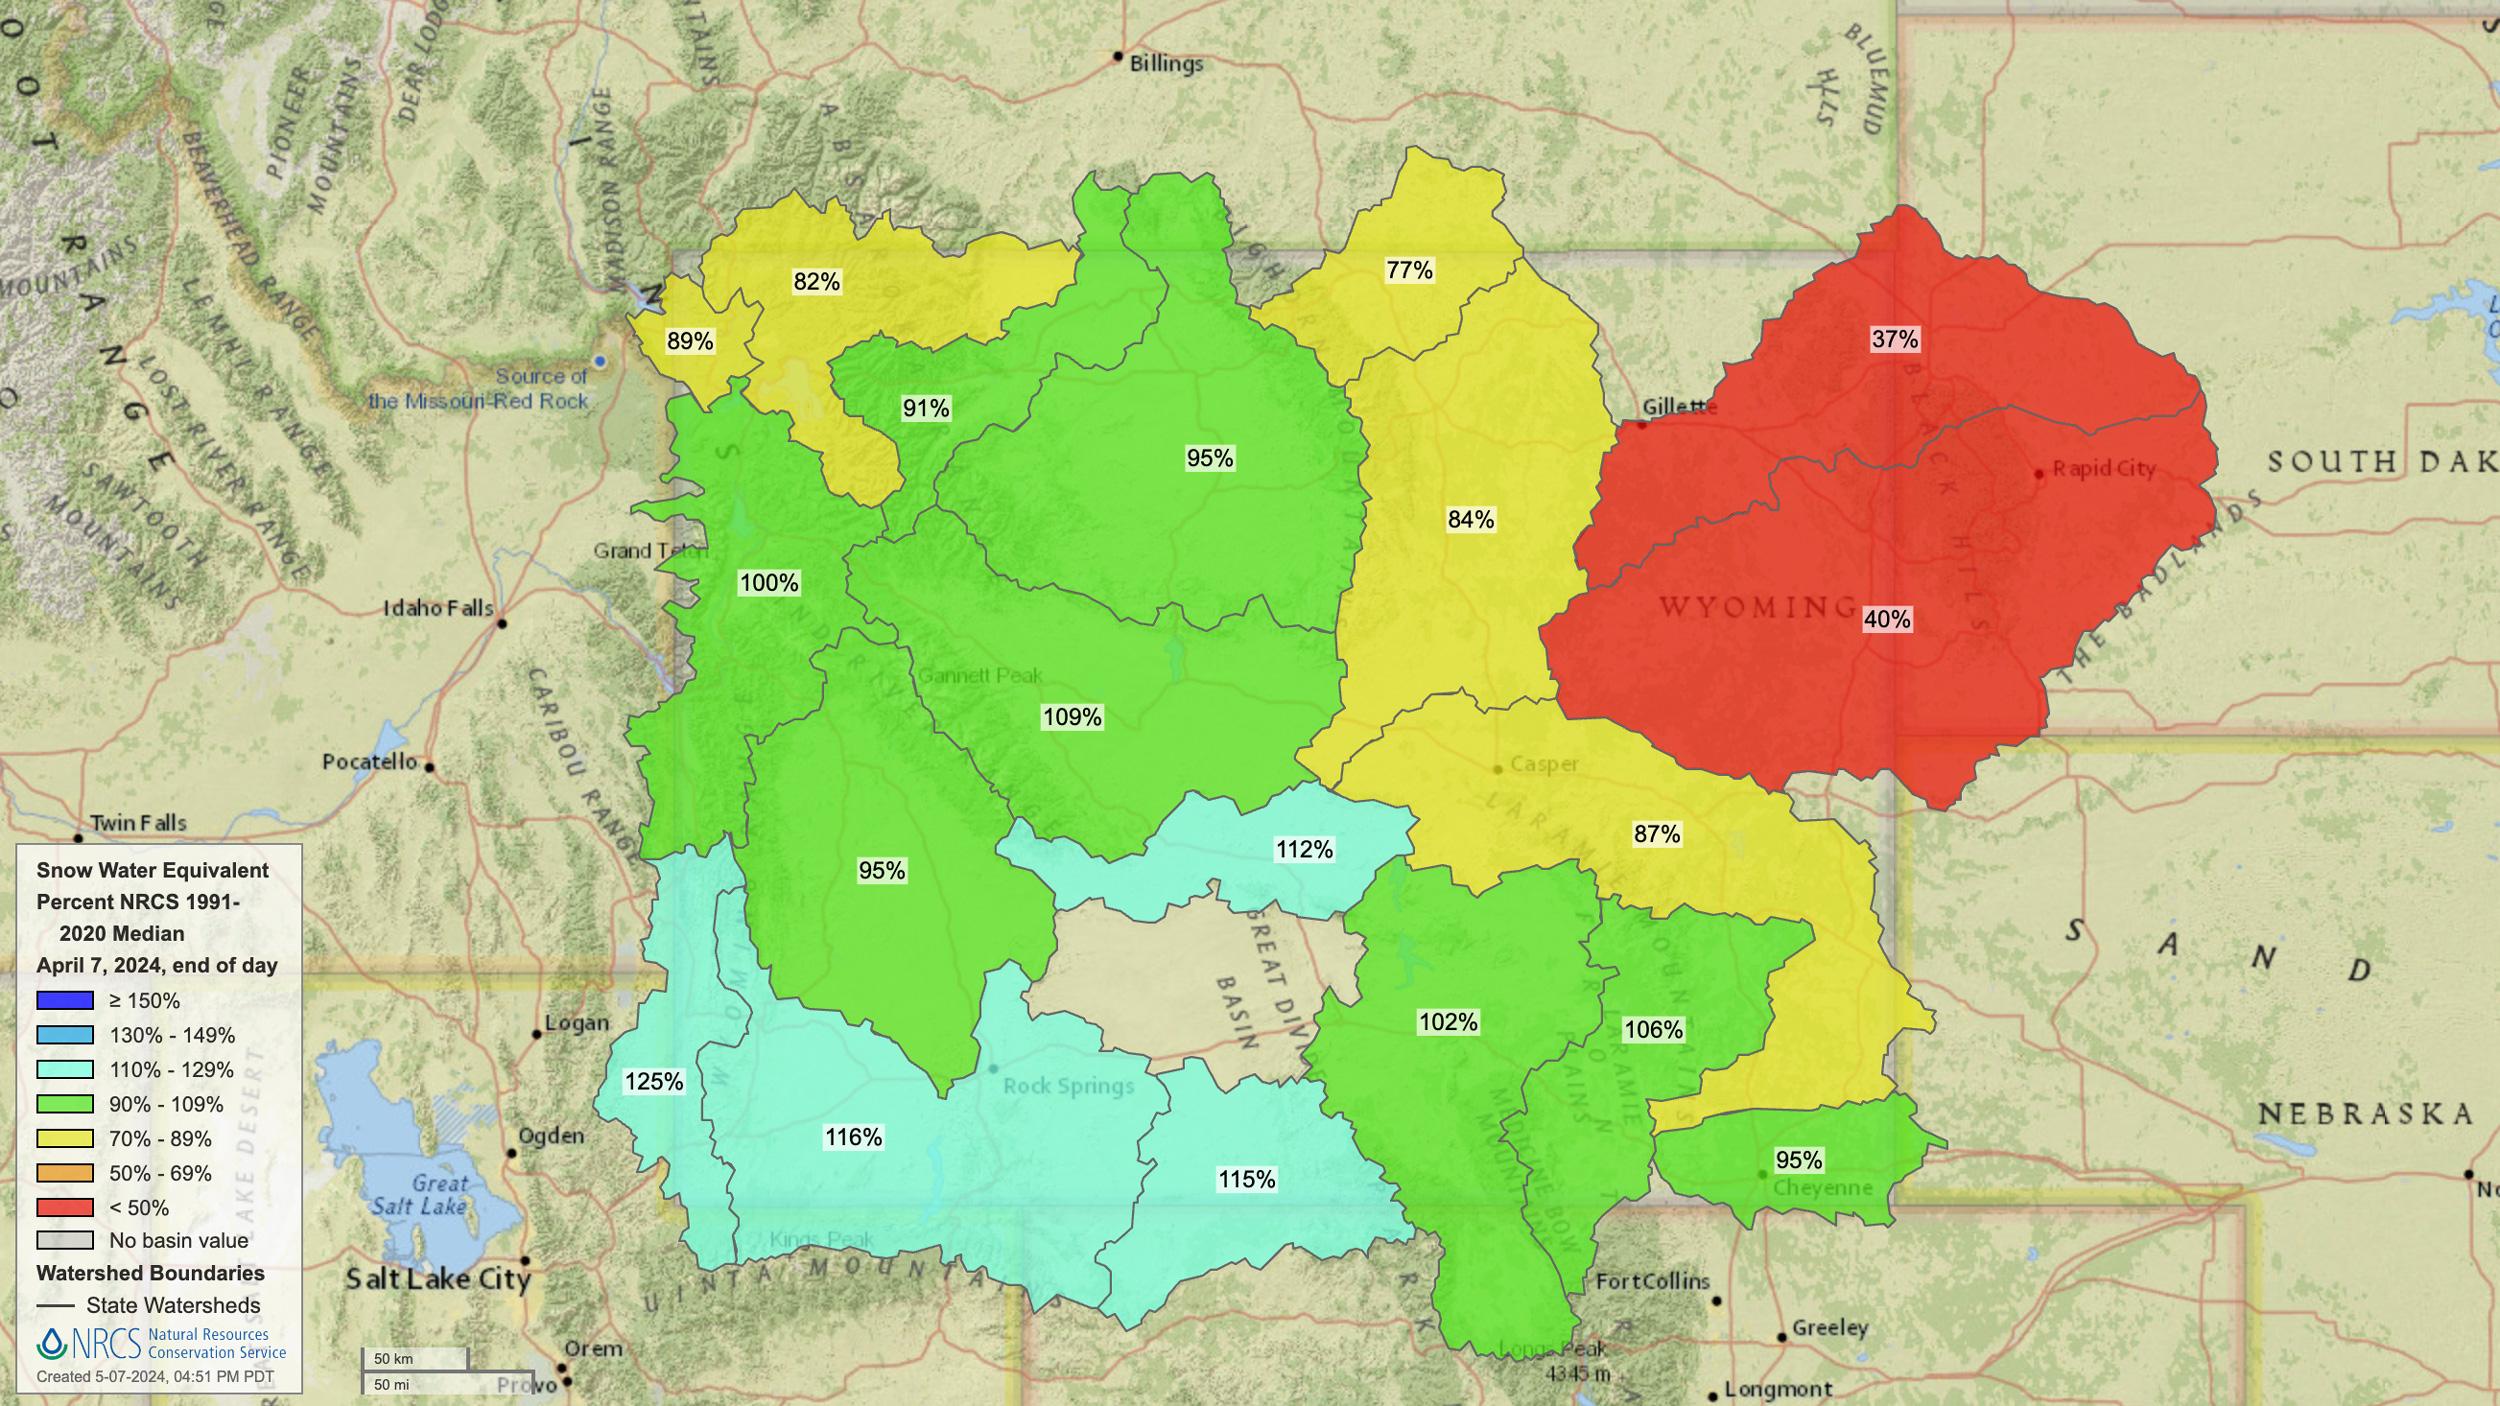
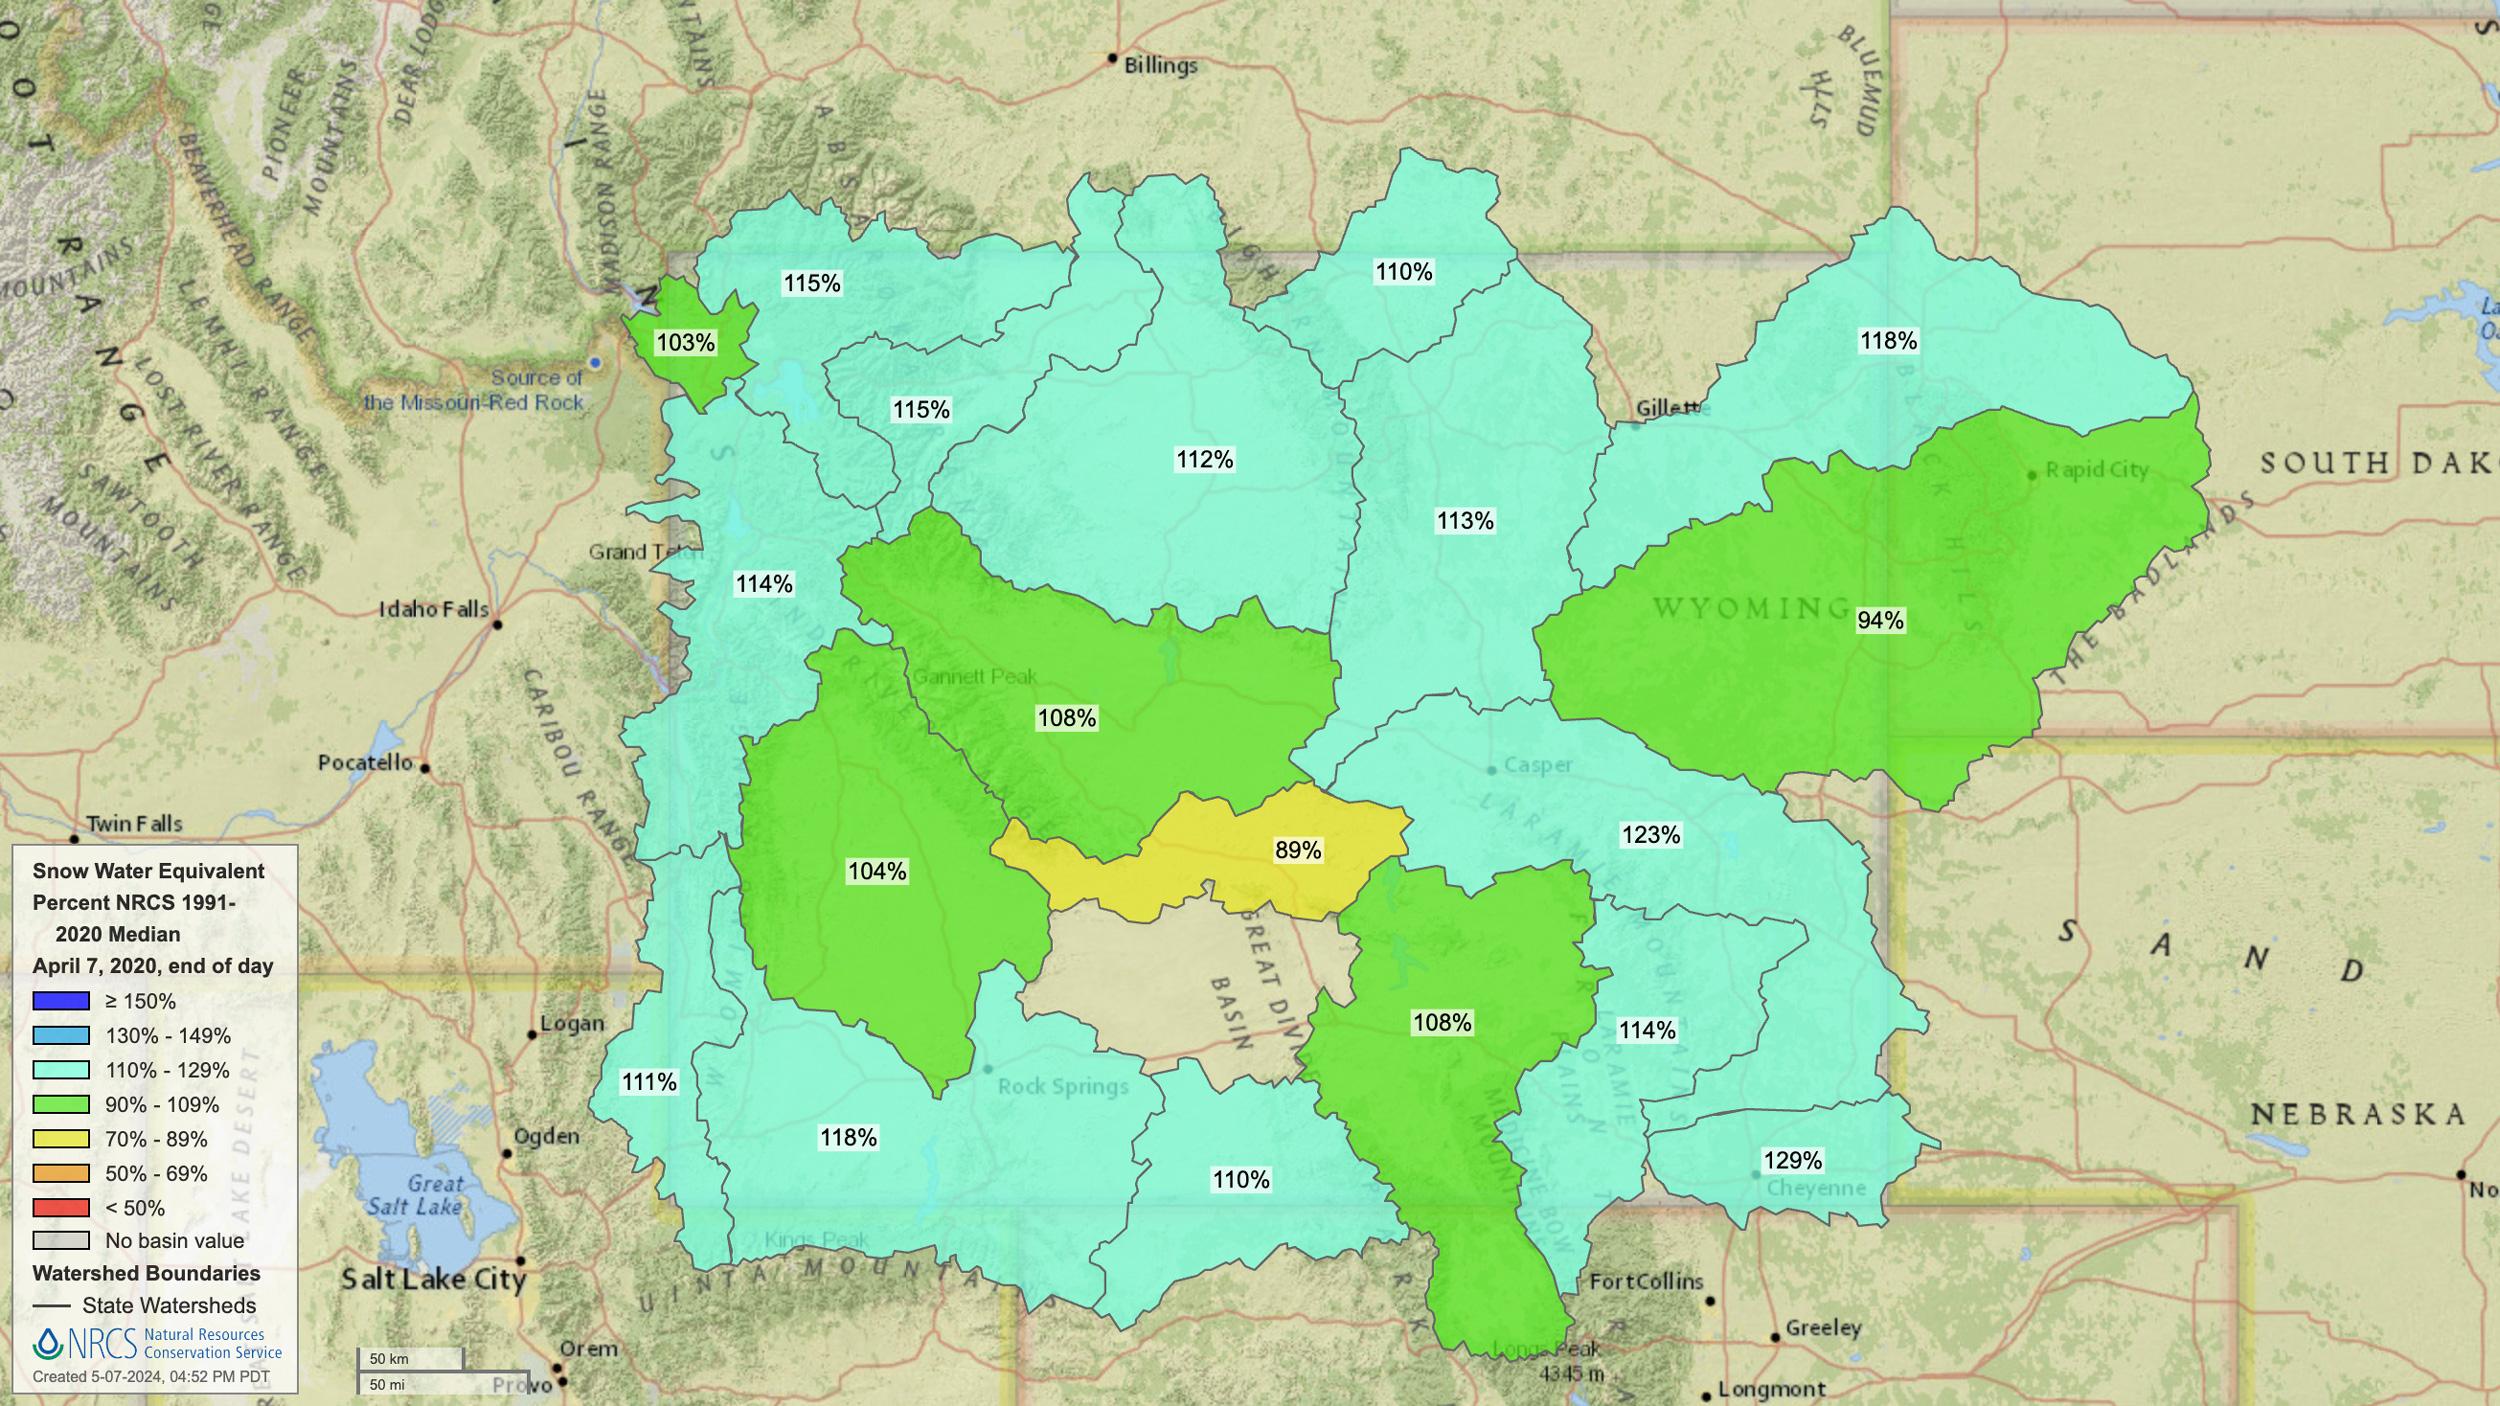
April 7, 2024, Wyoming snow water equivalent map.
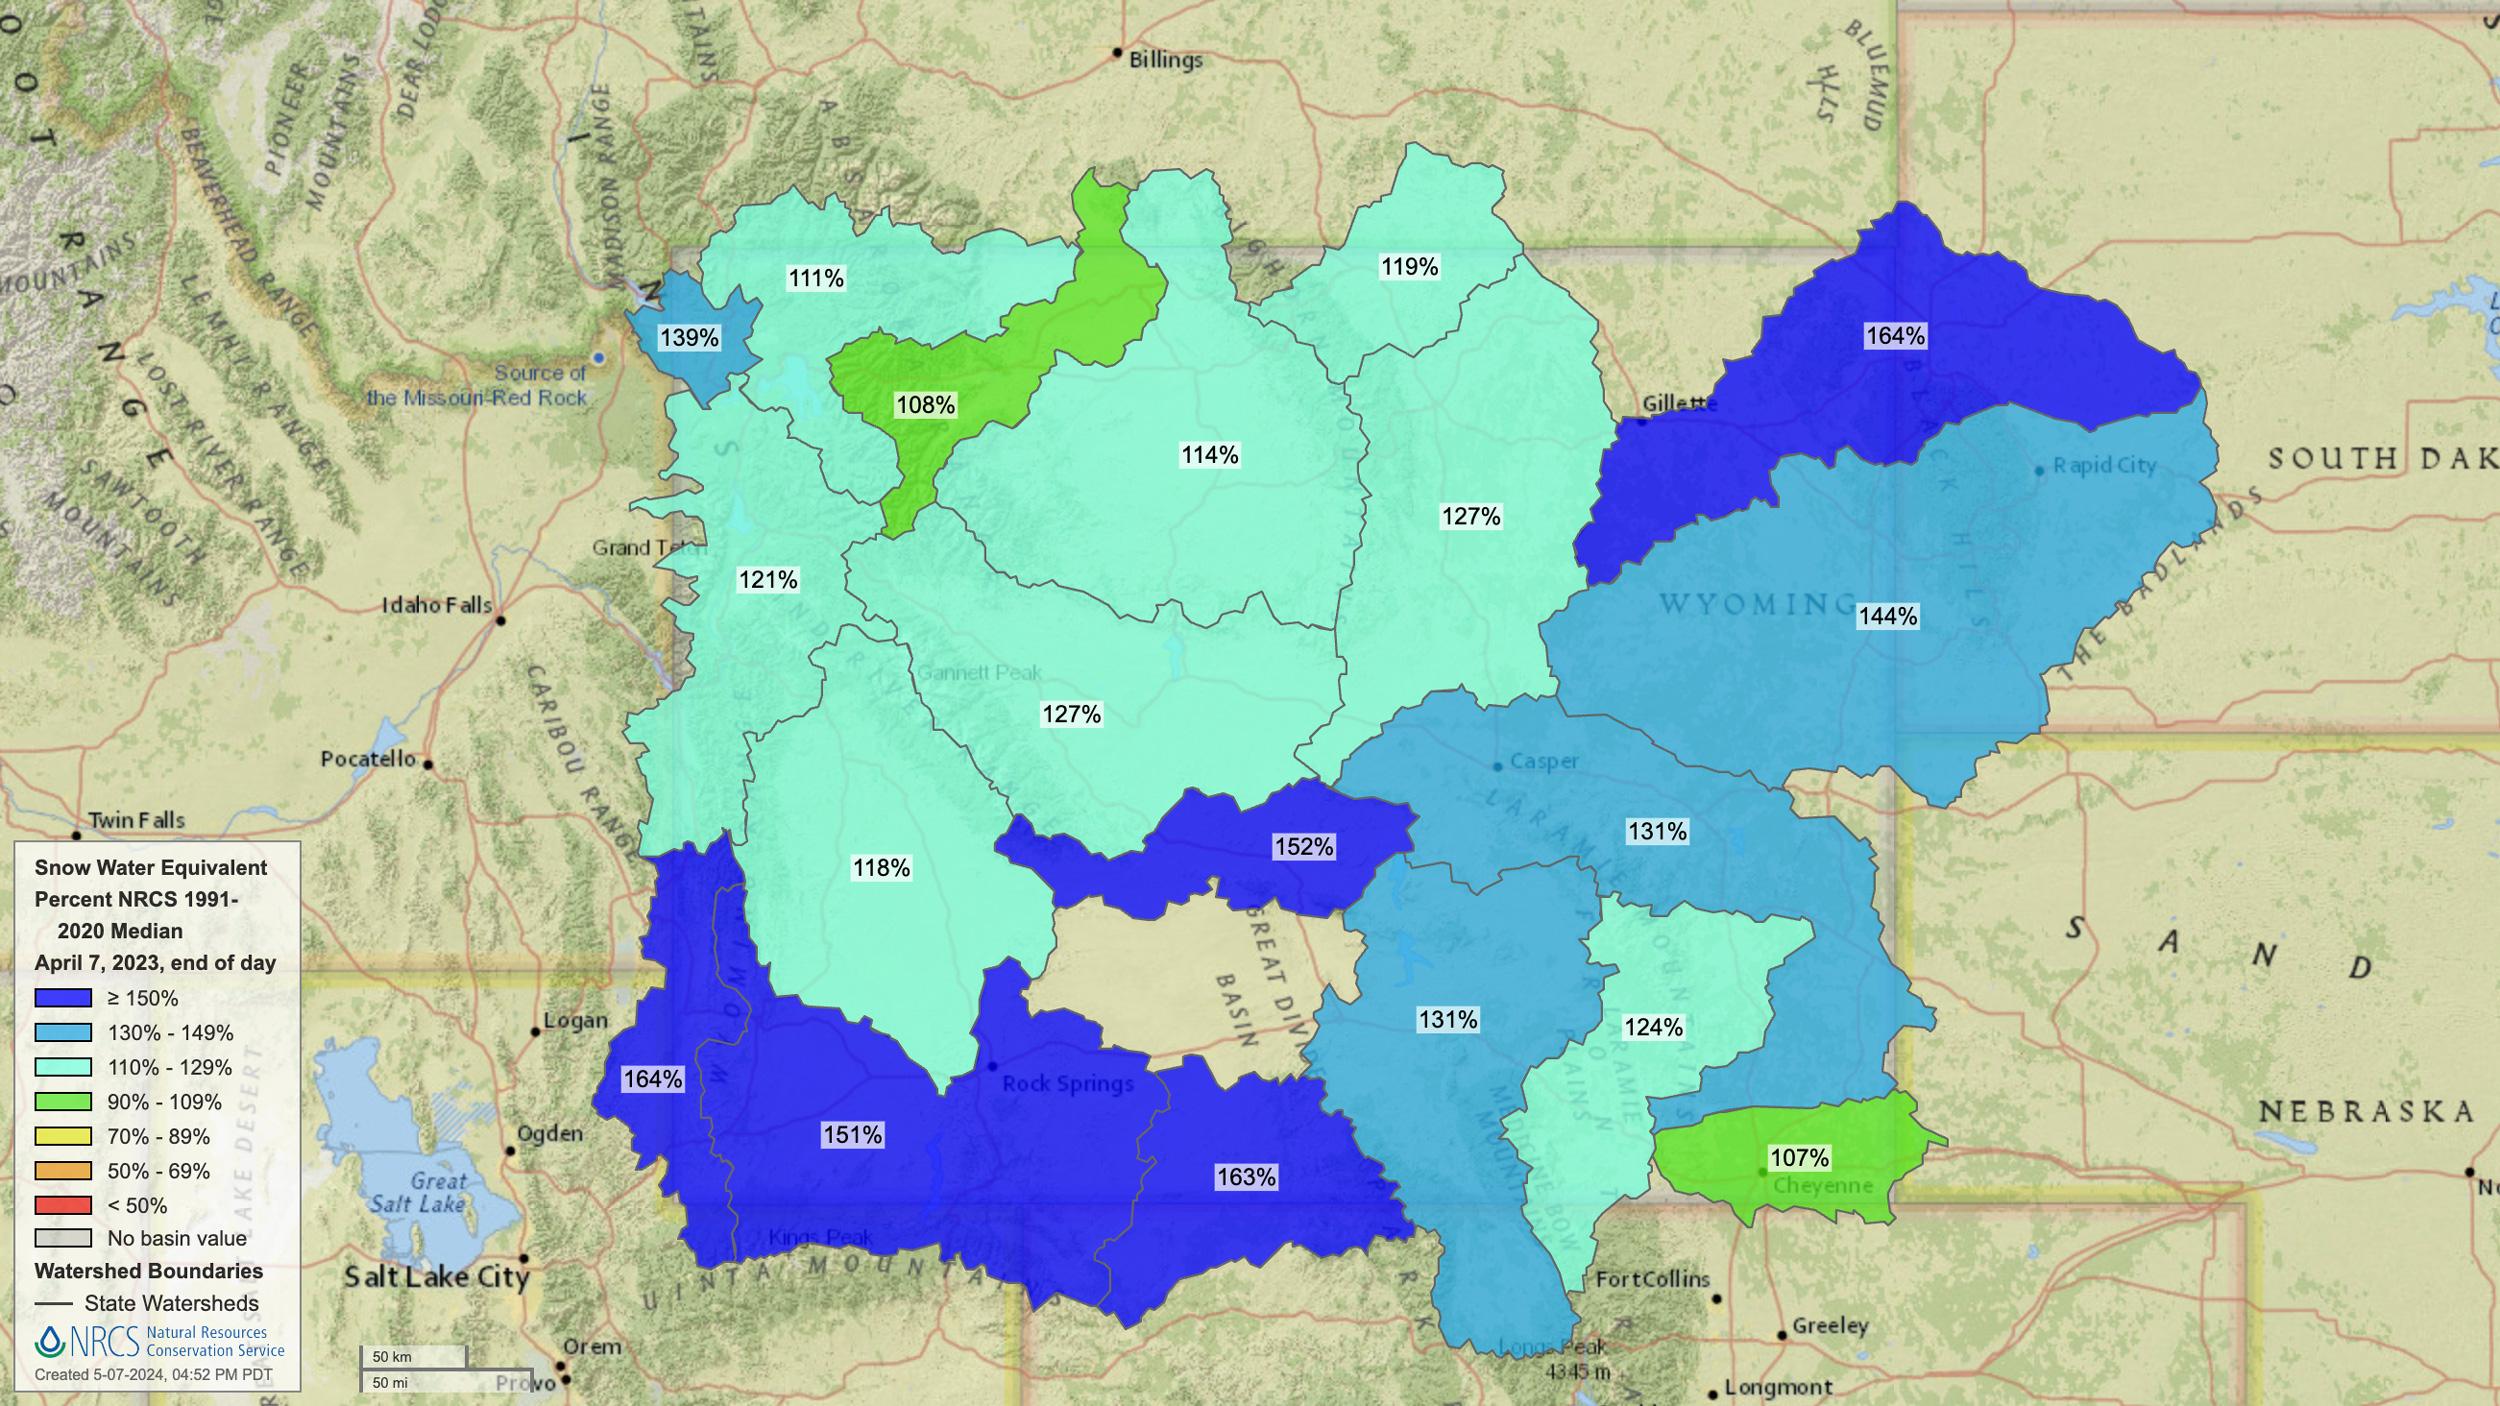
April 7, 2023, Wyoming snow water equivalent map.
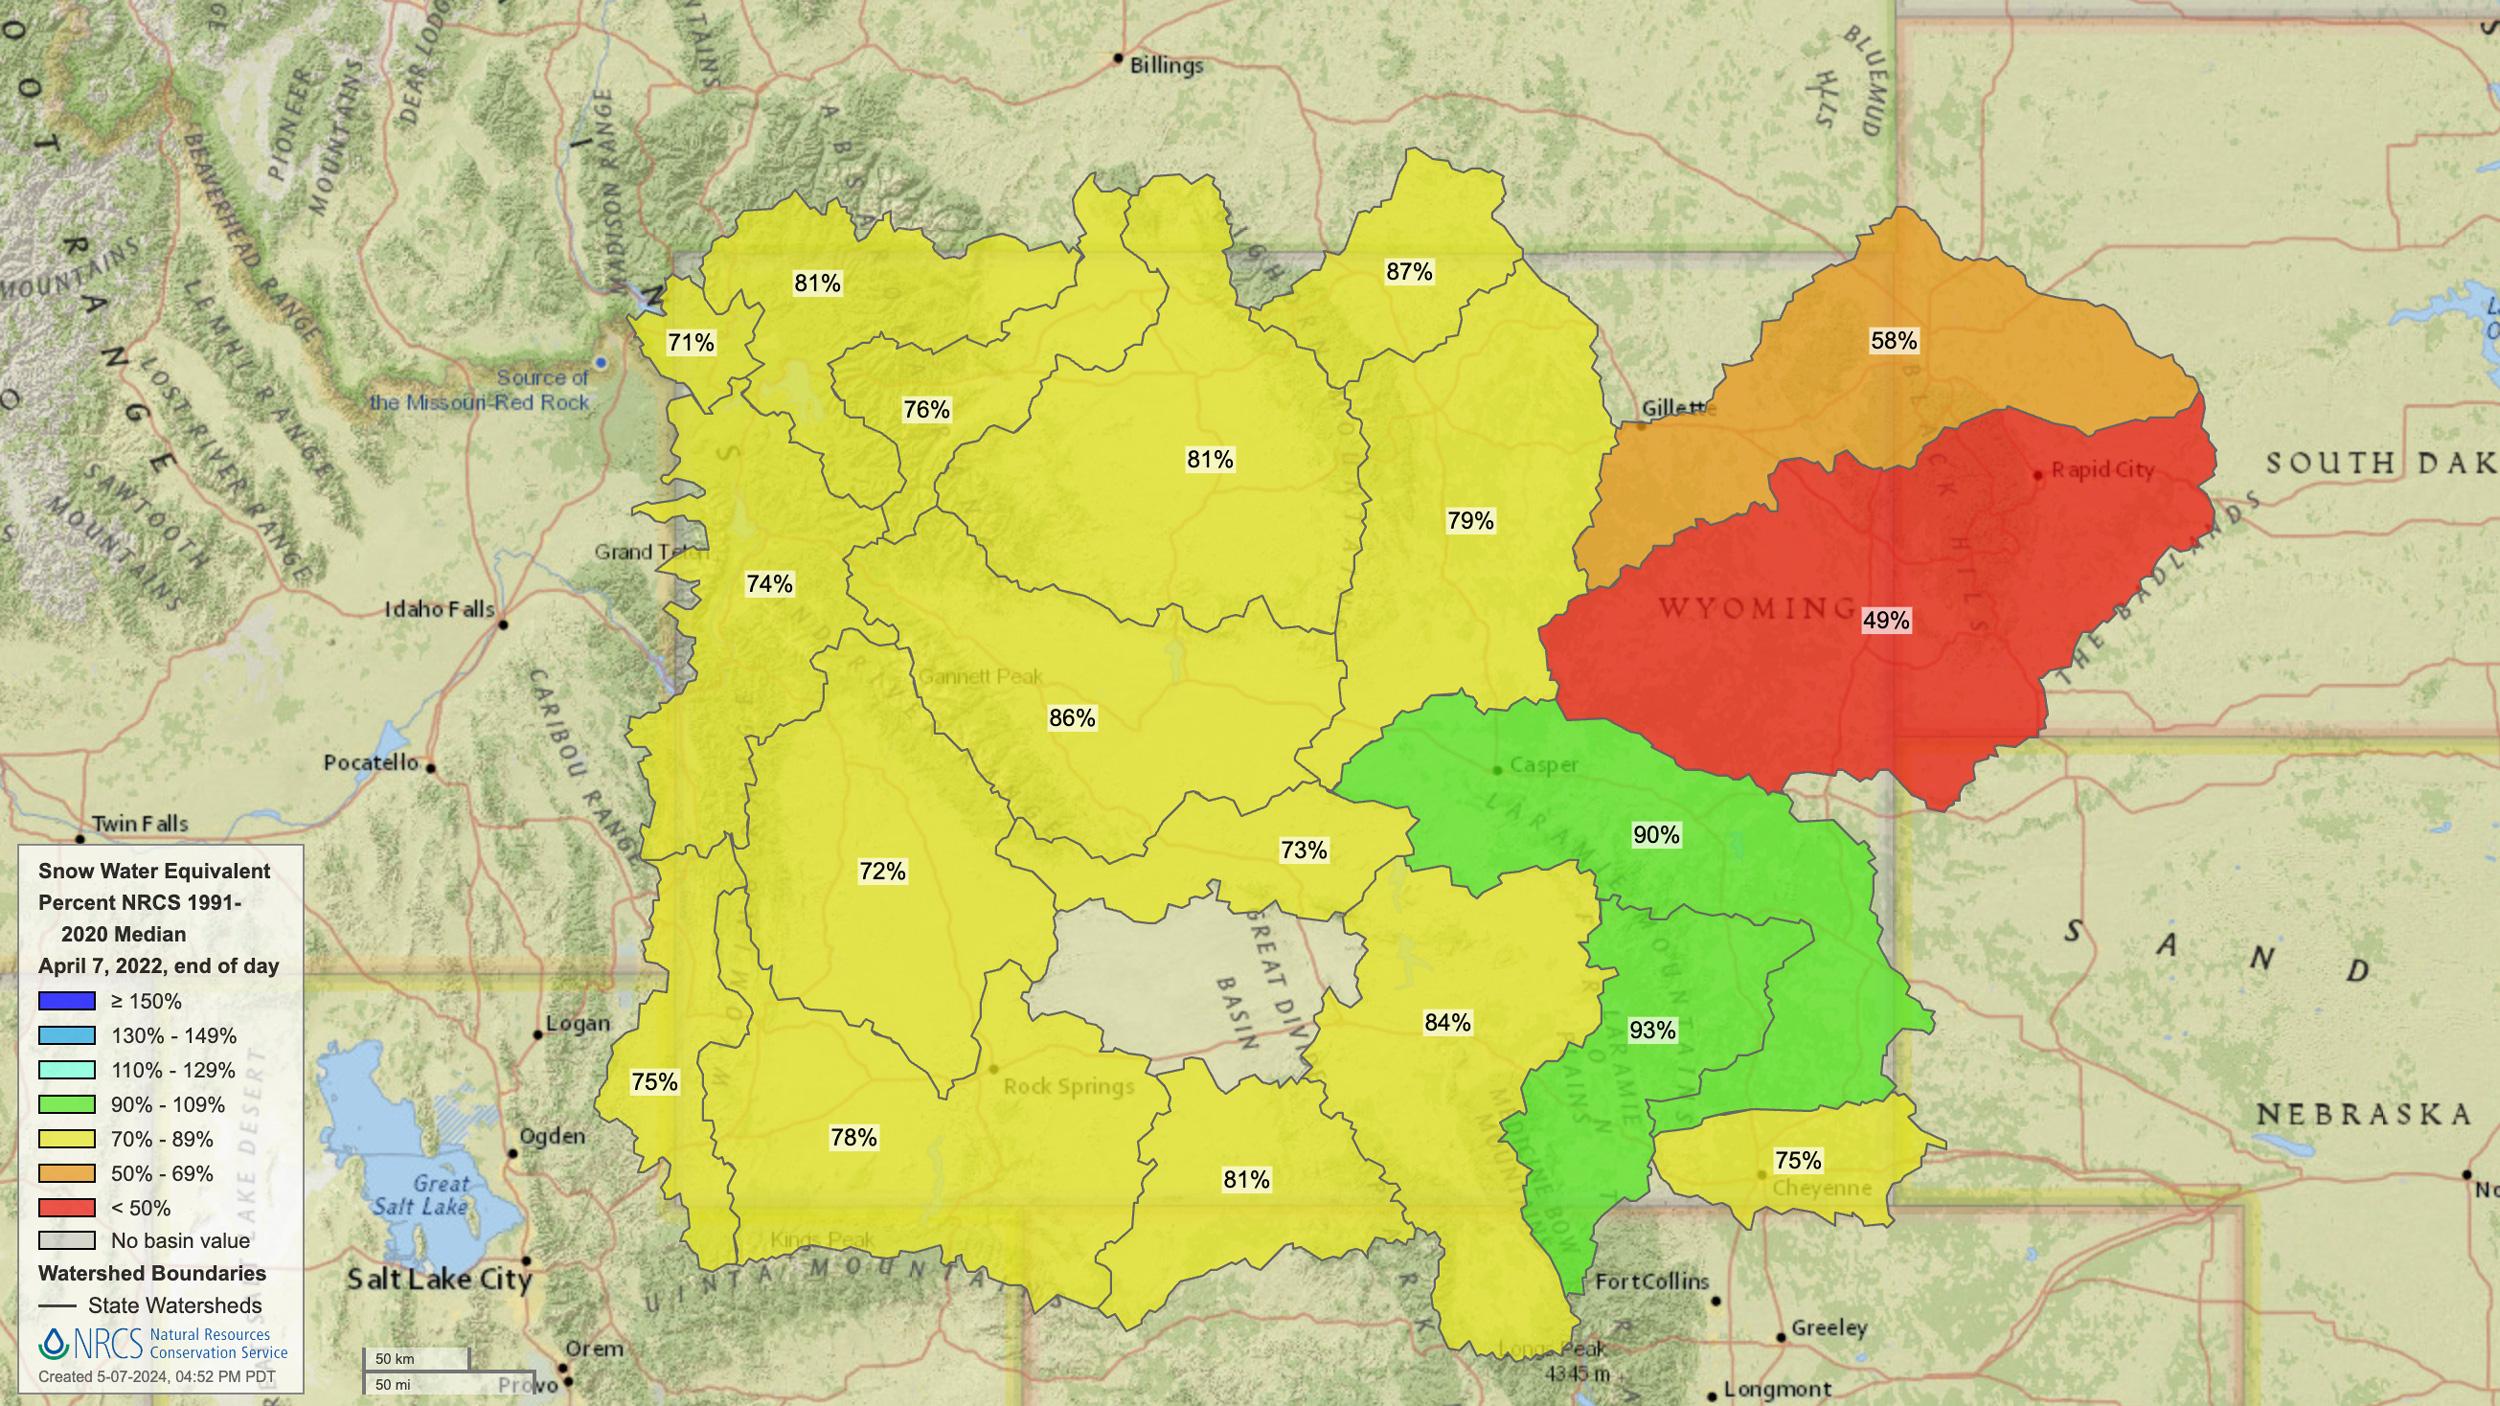
April 7, 2022, Wyoming snow water equivalent map.
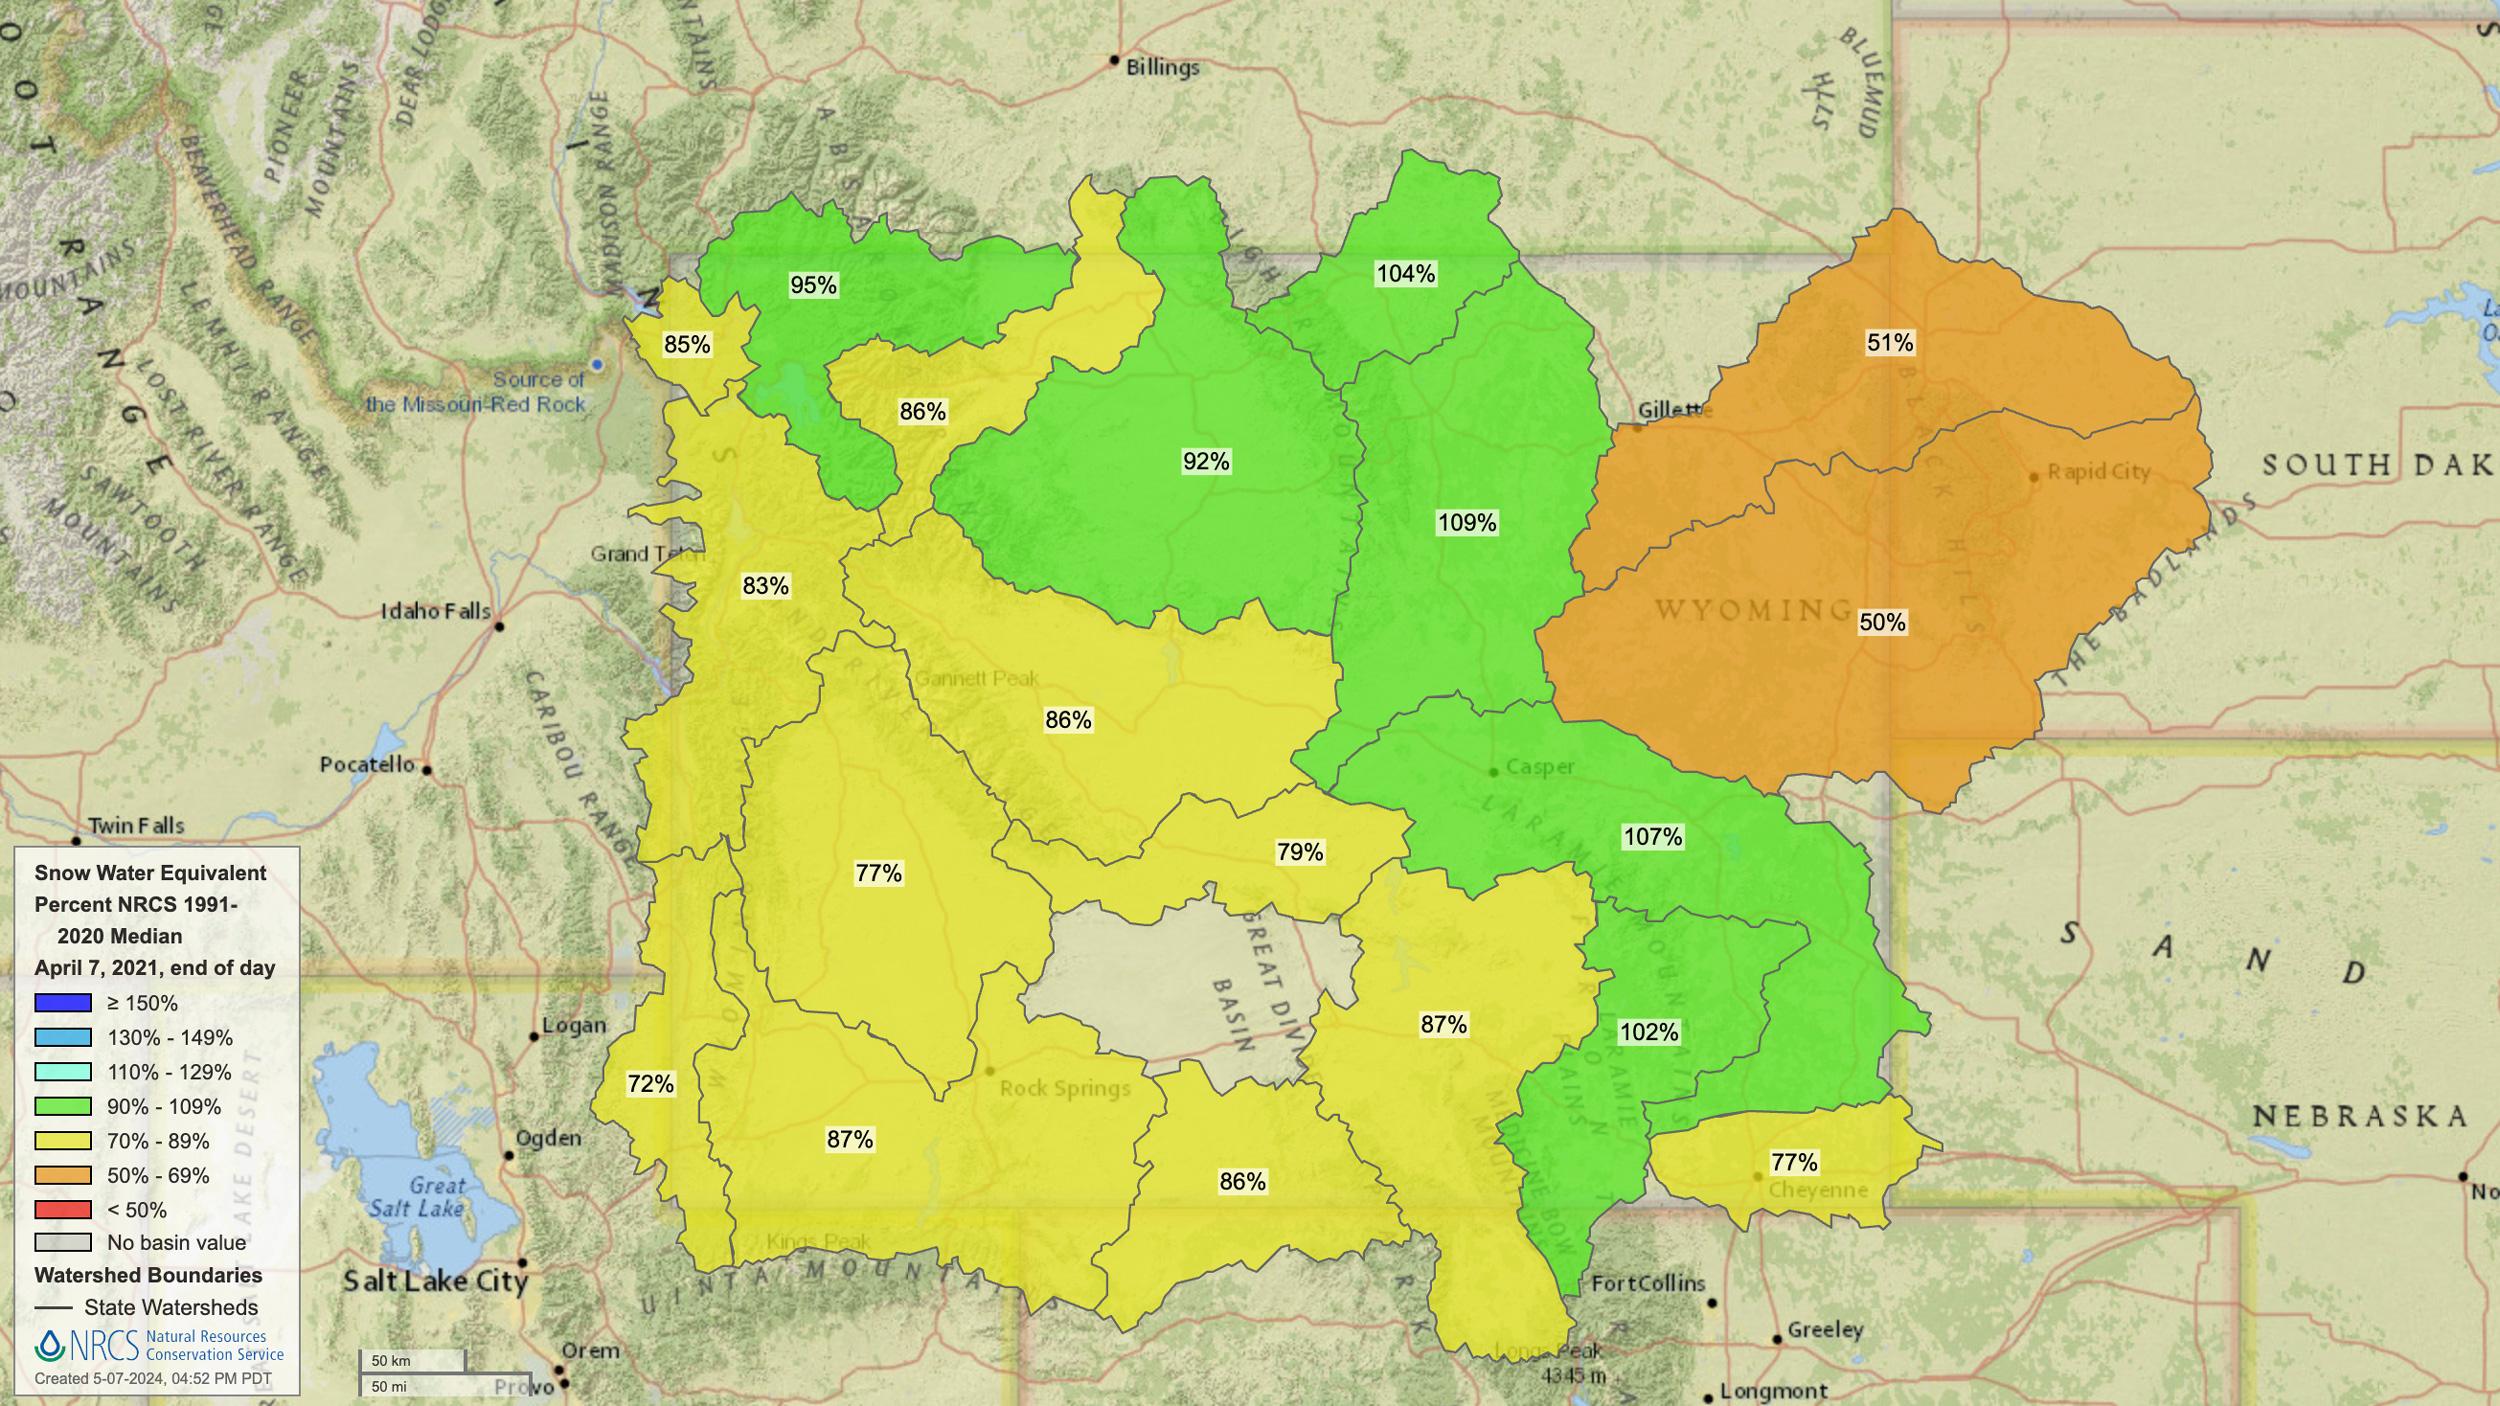
April 7, 2021, Wyoming snow water equivalent map.
April 7, 2020, Wyoming snow water equivalent map.
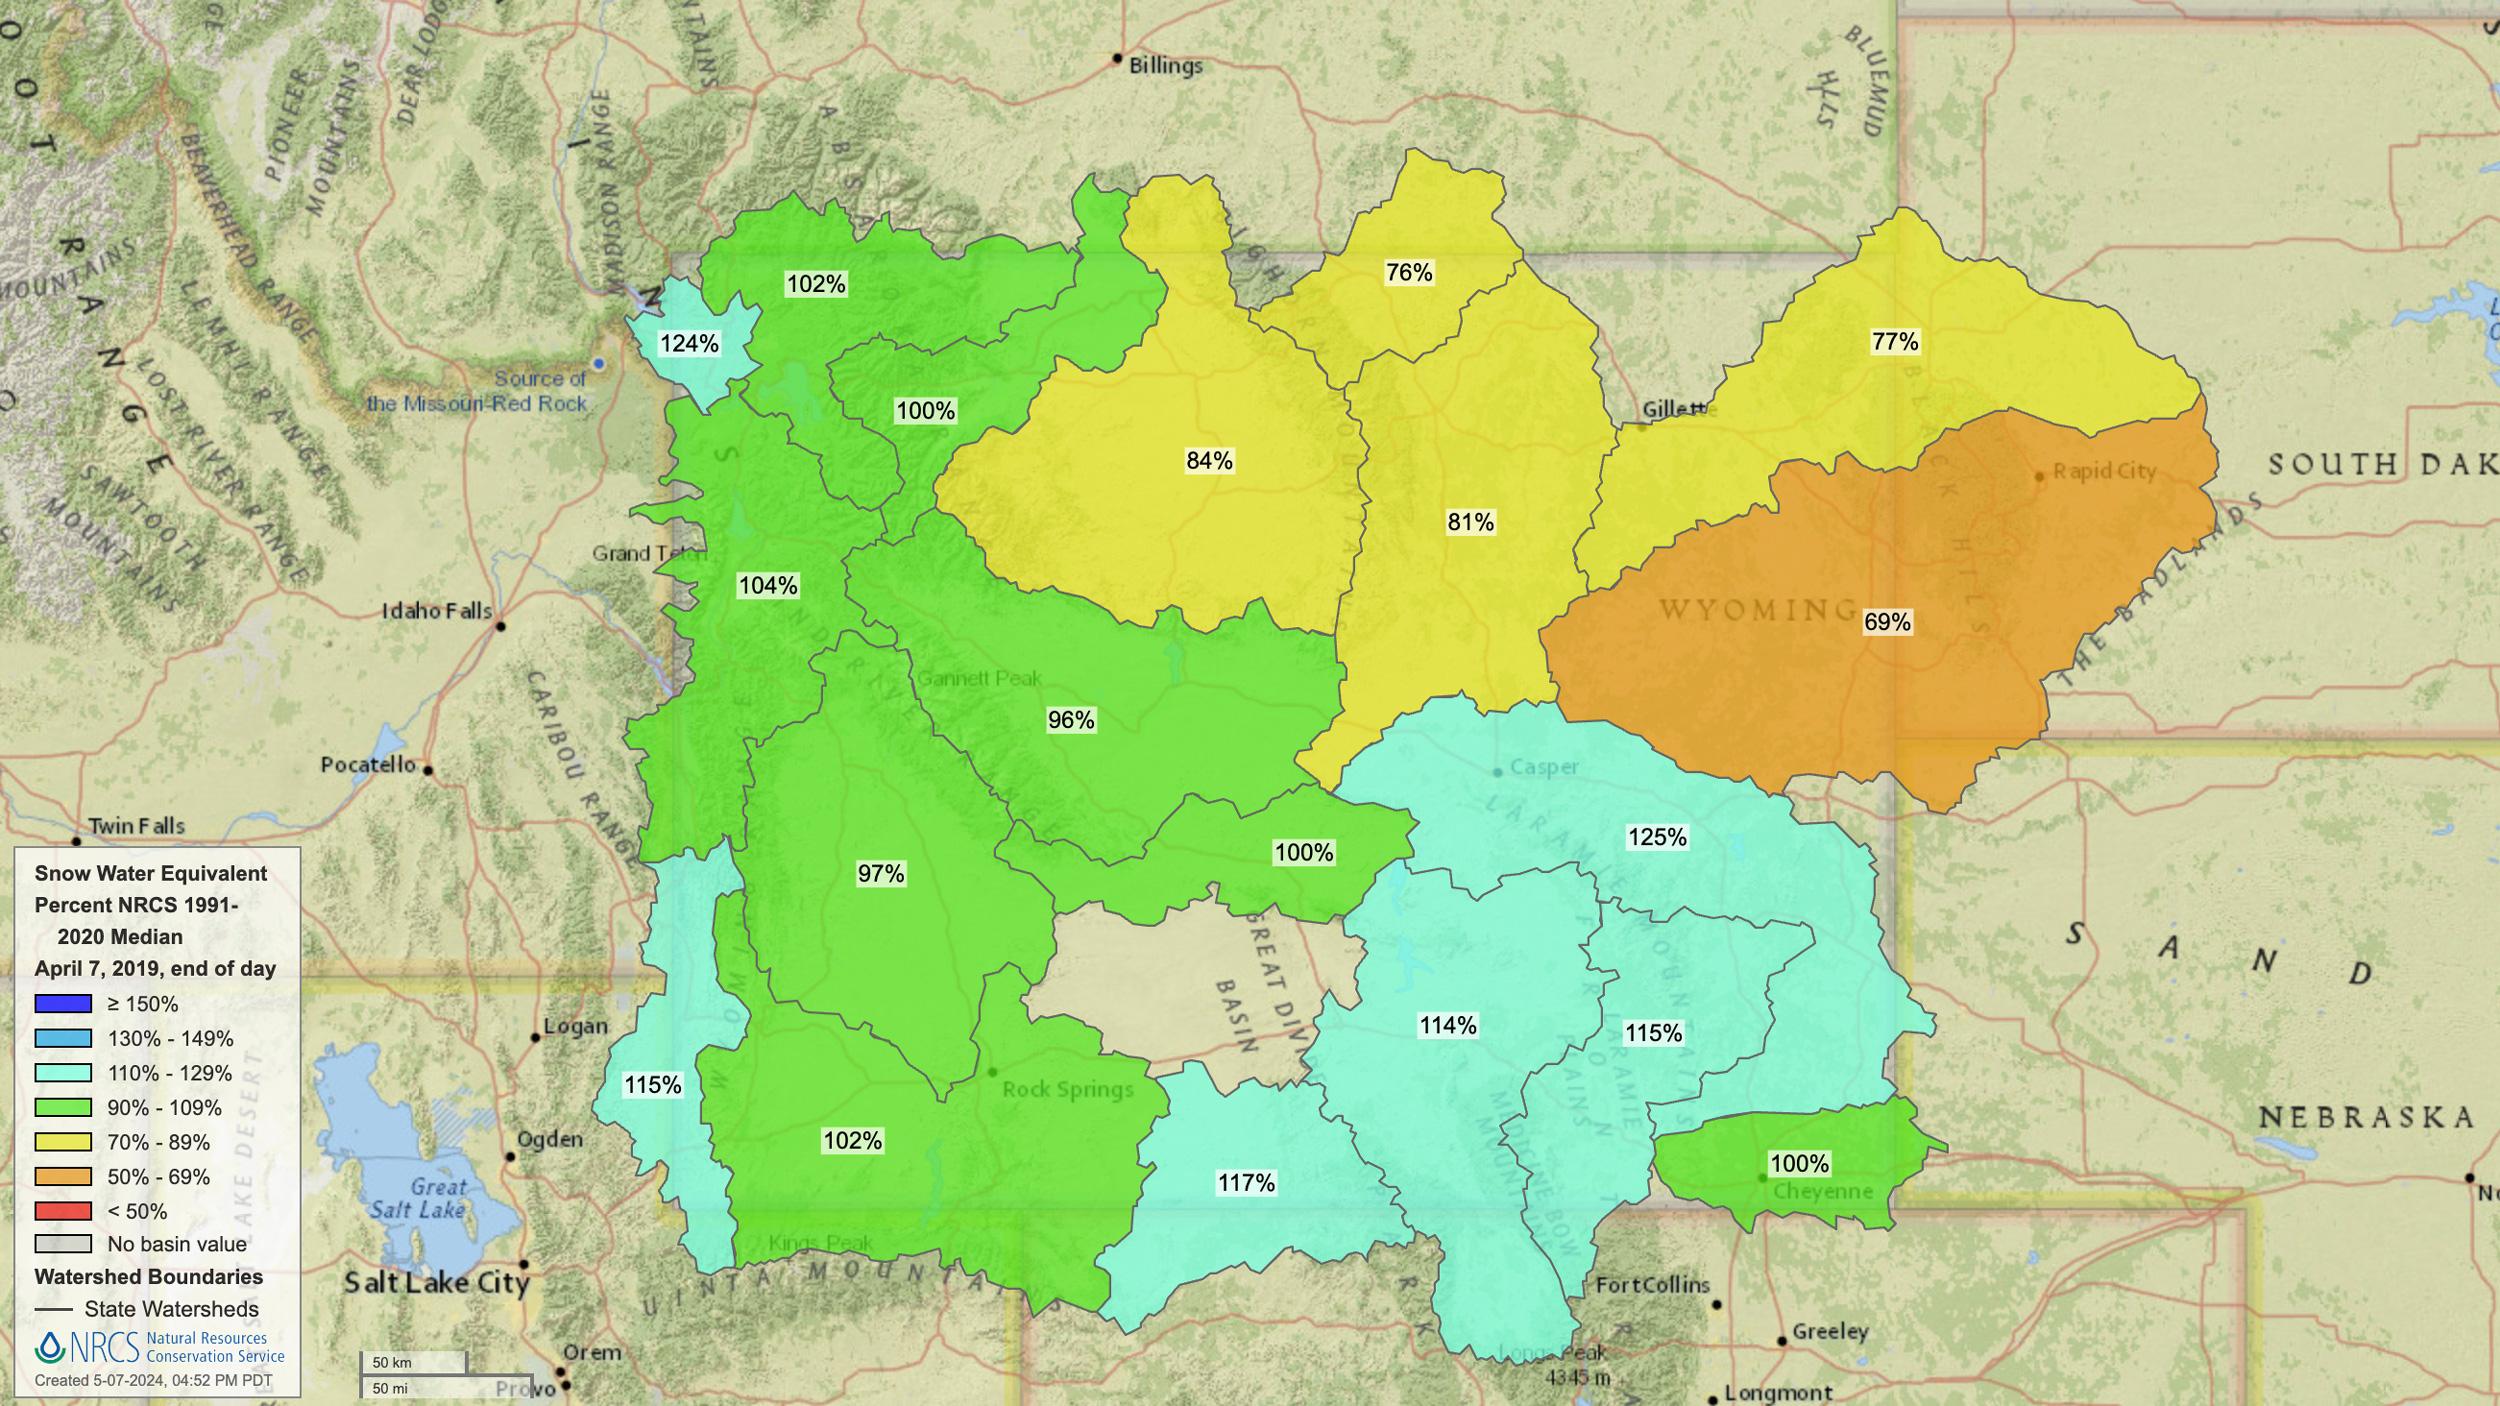
April 7, 2019, Wyoming snow water equivalent map.
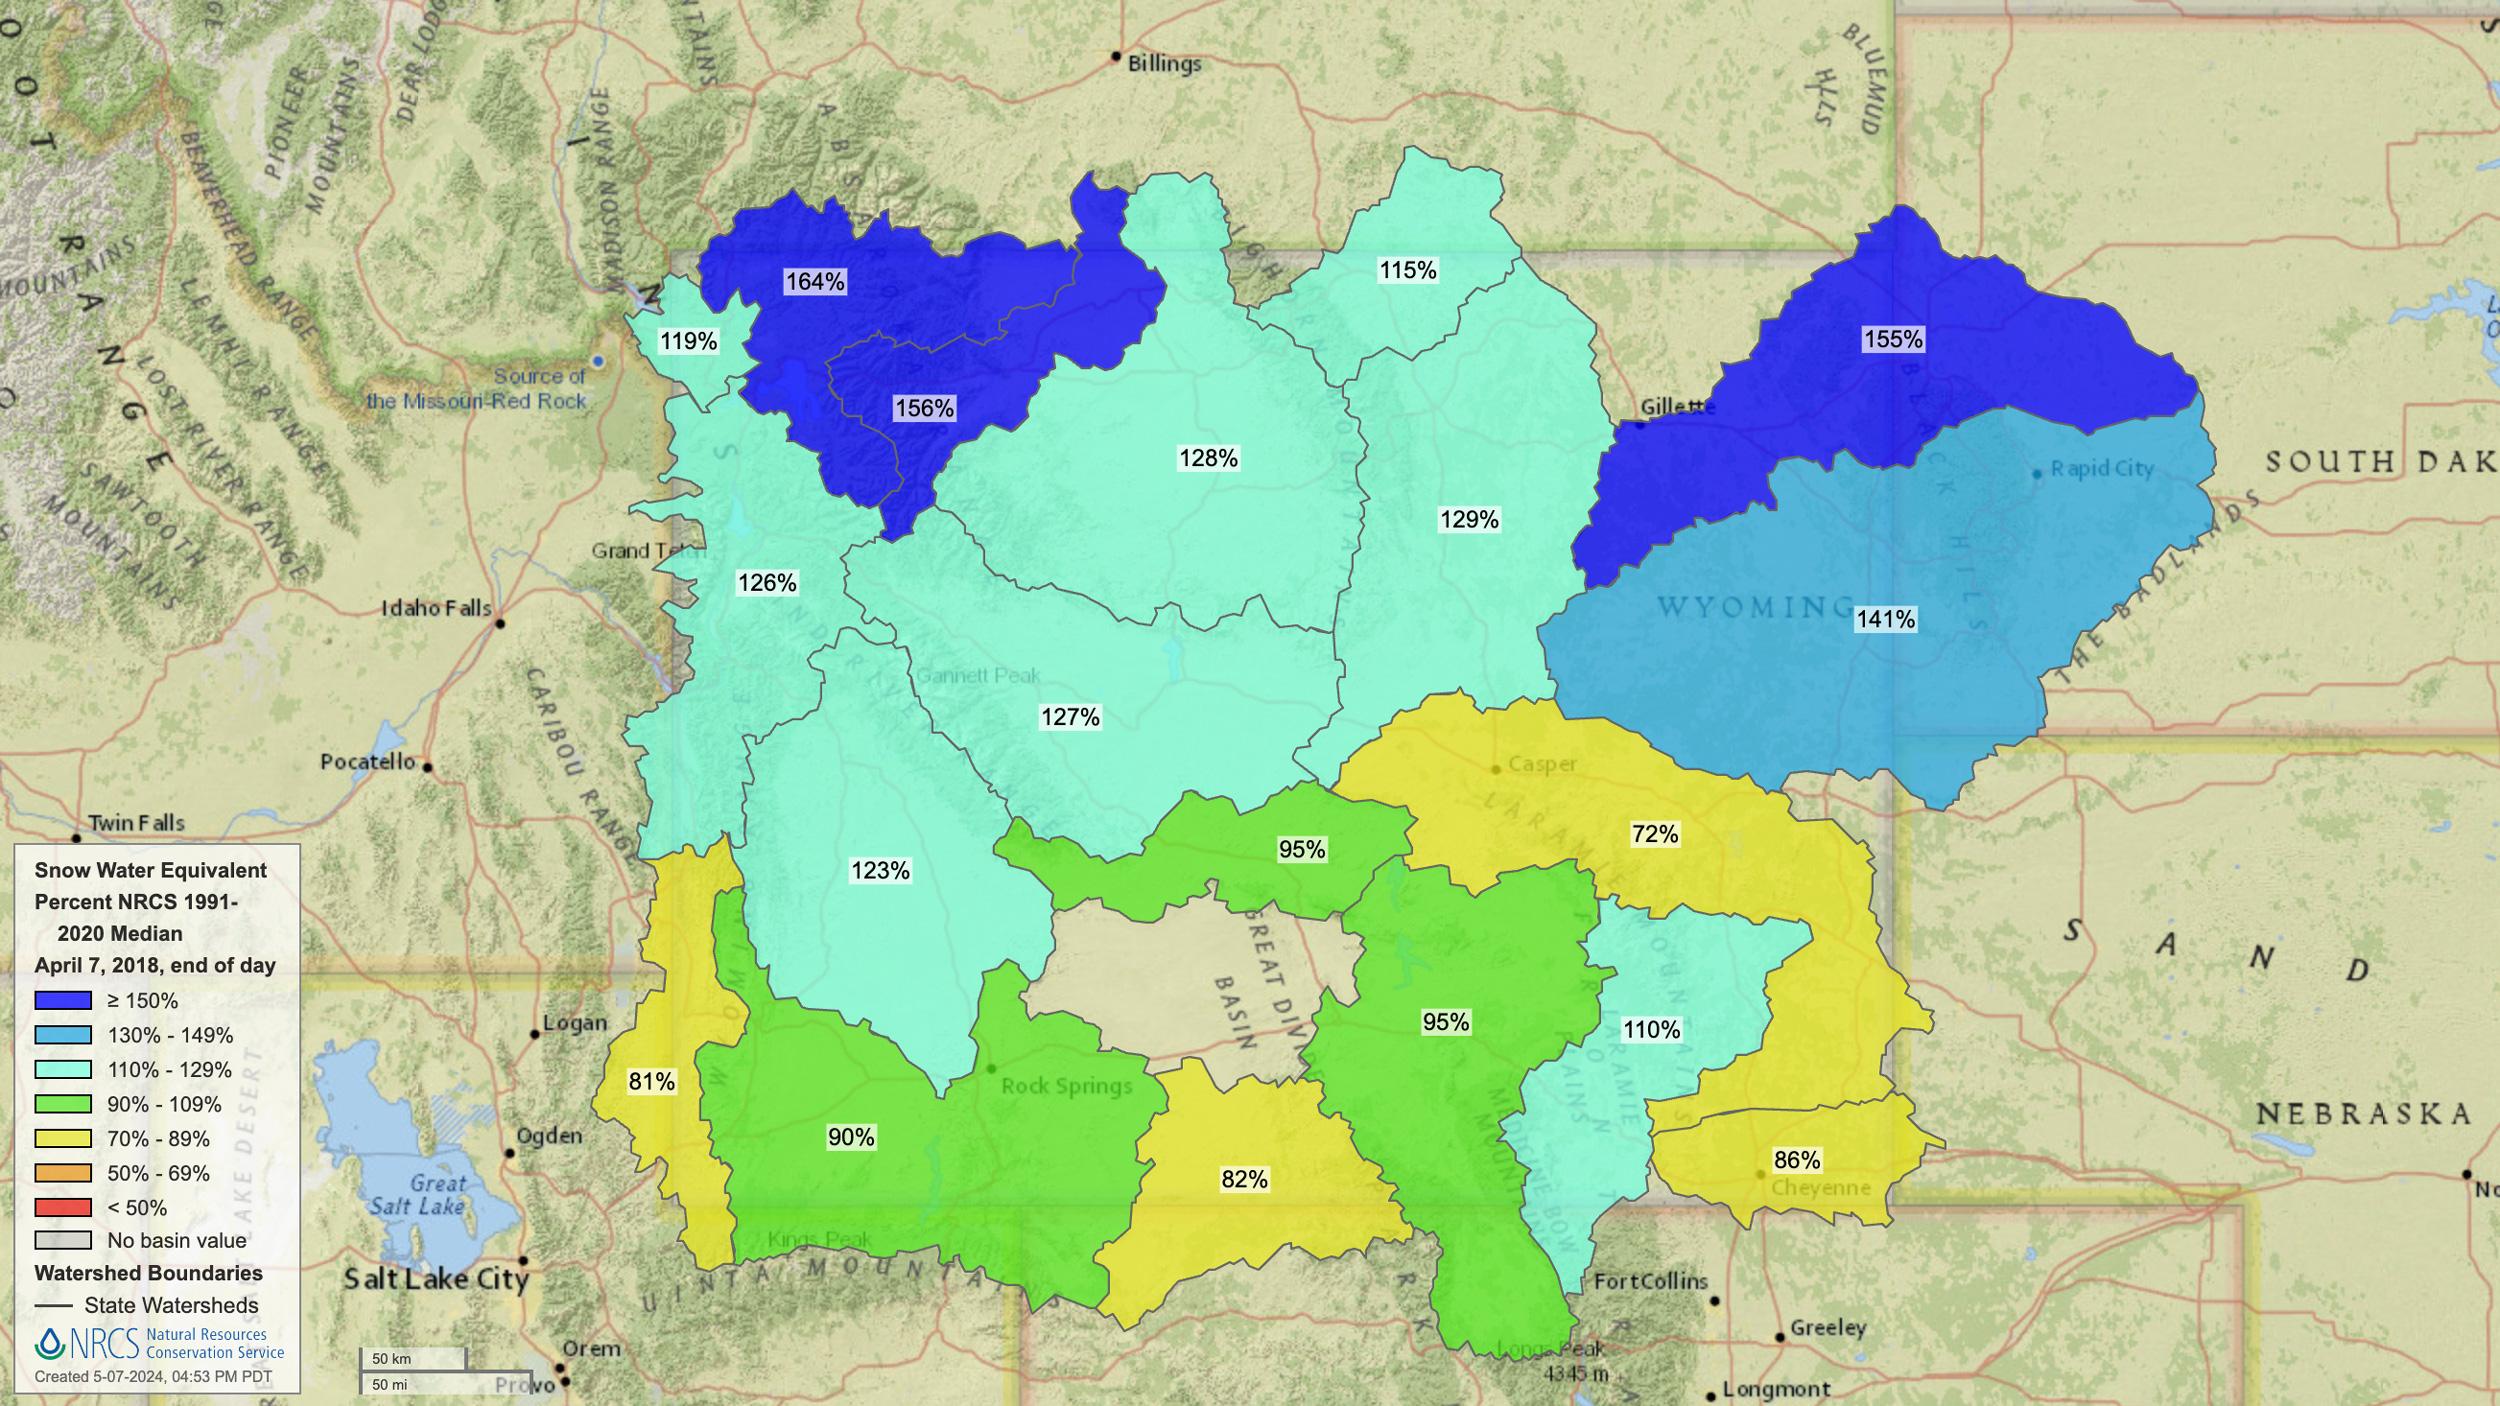
April 7, 2018, Wyoming snow water equivalent map.
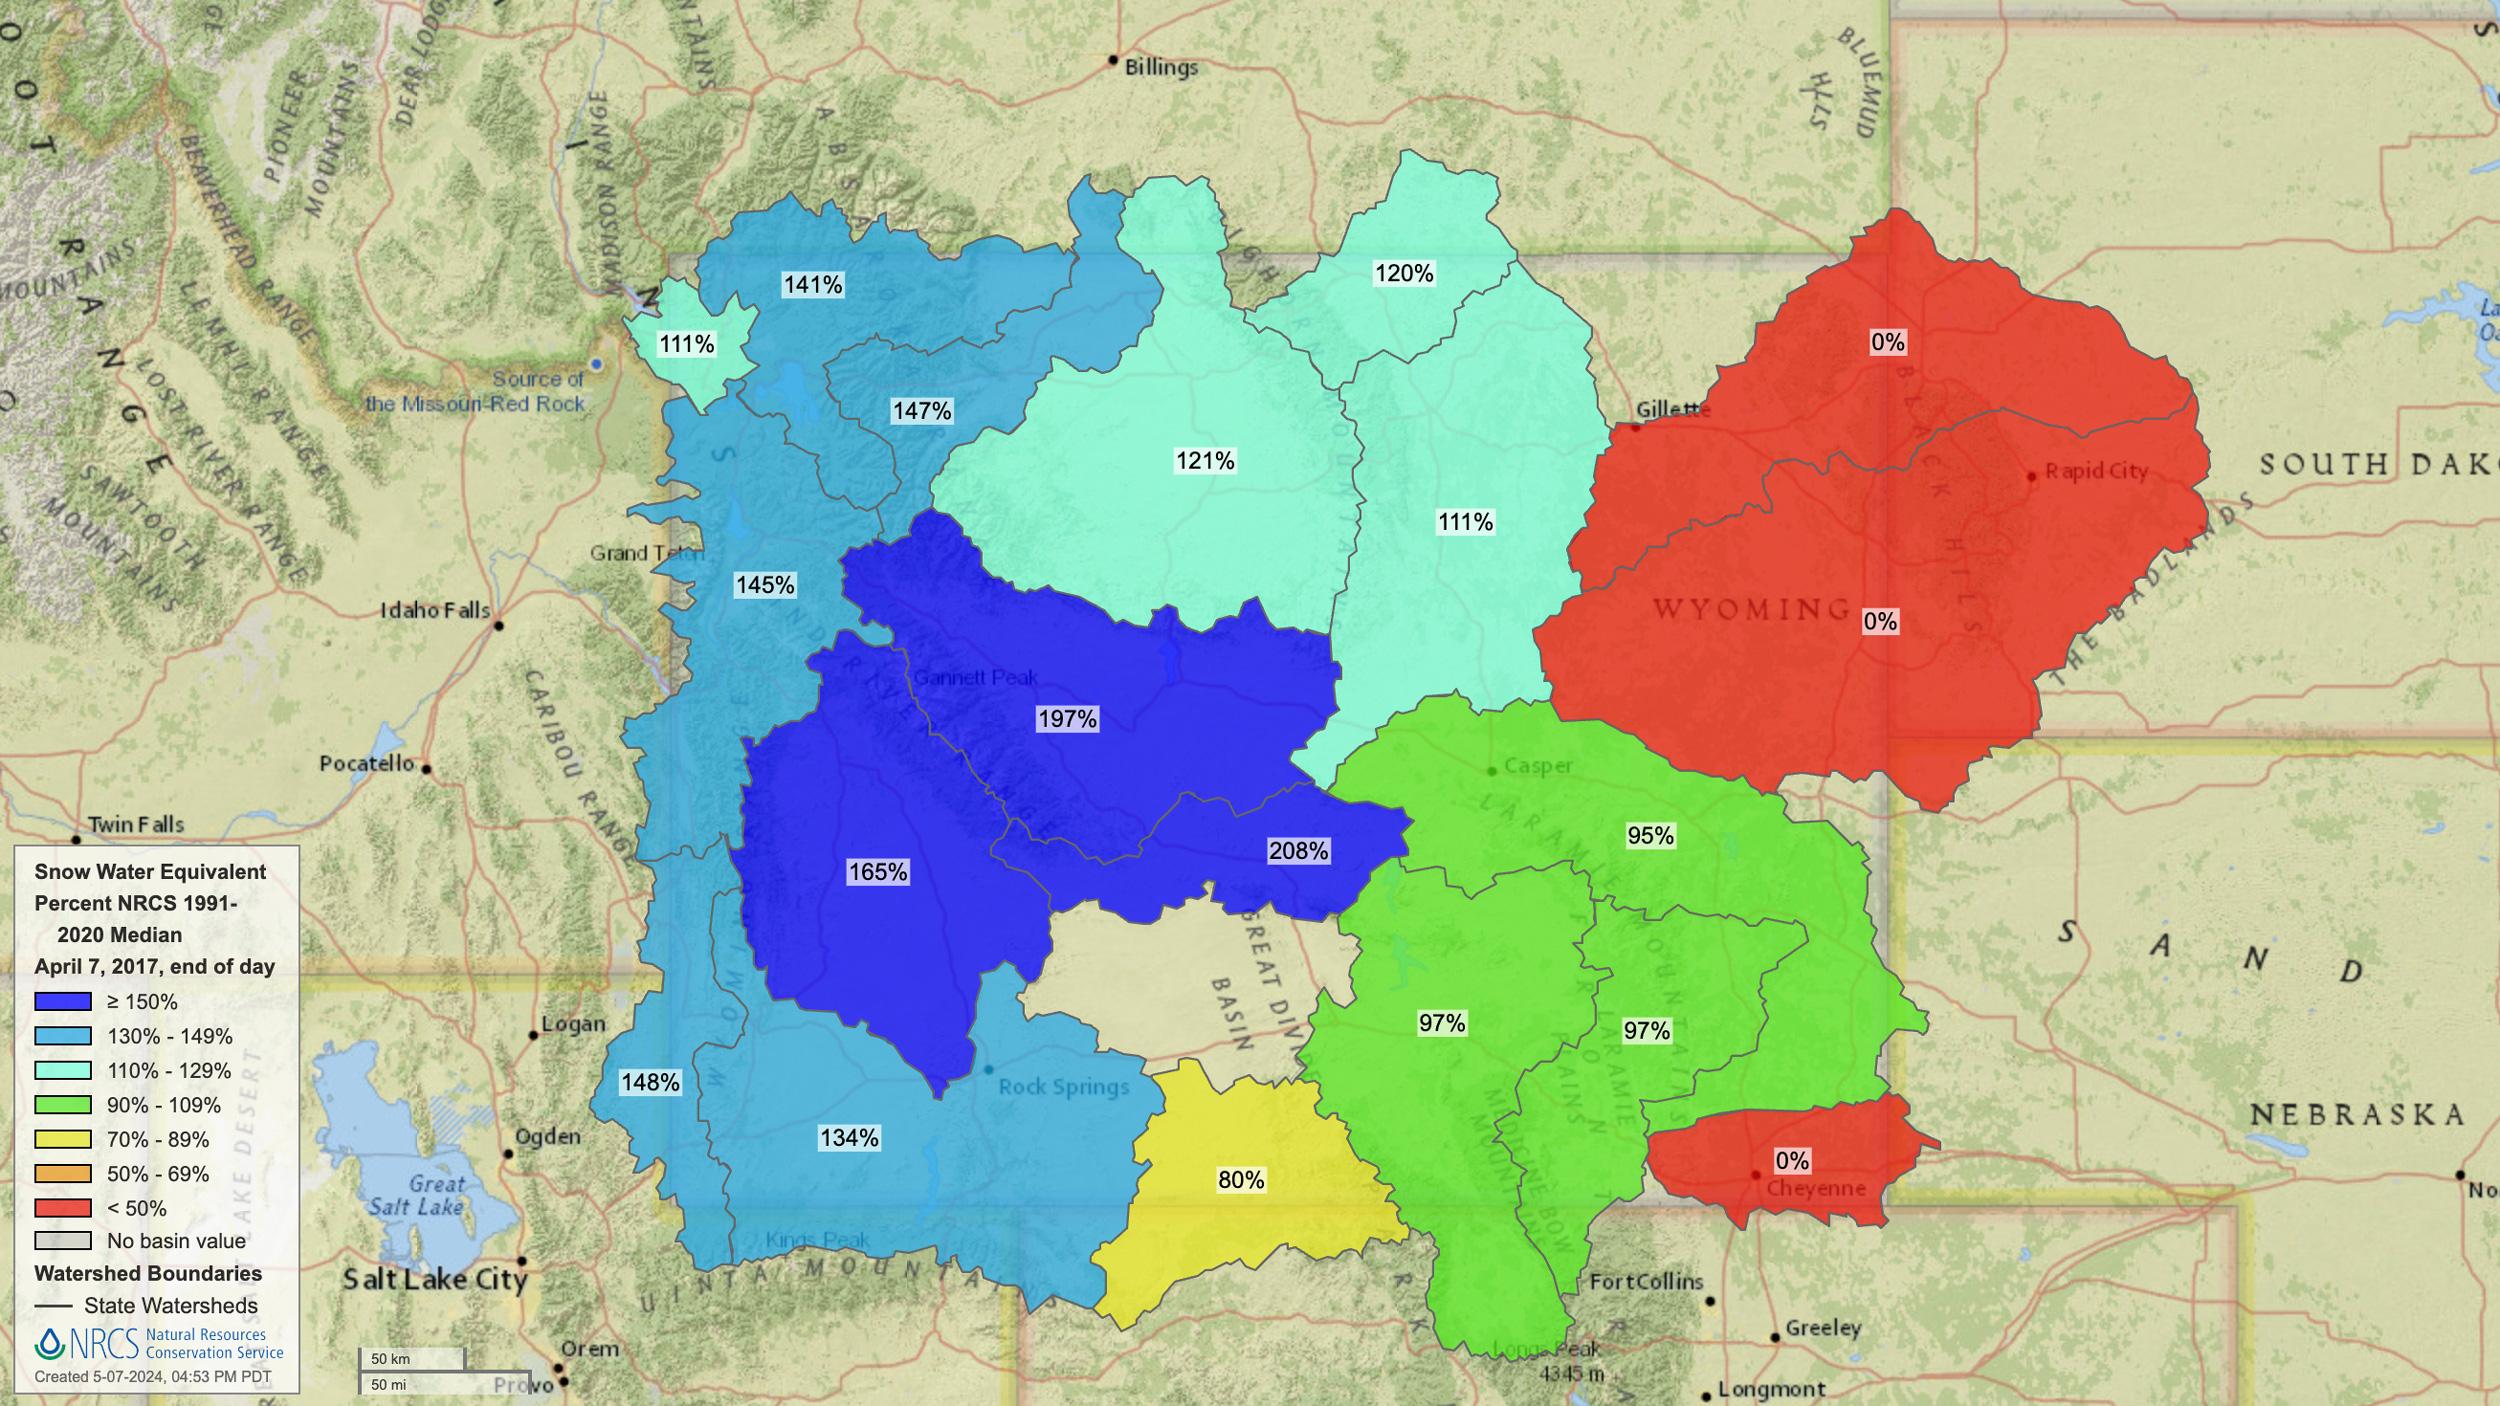
April 7, 2017, Wyoming snow water equivalent map.
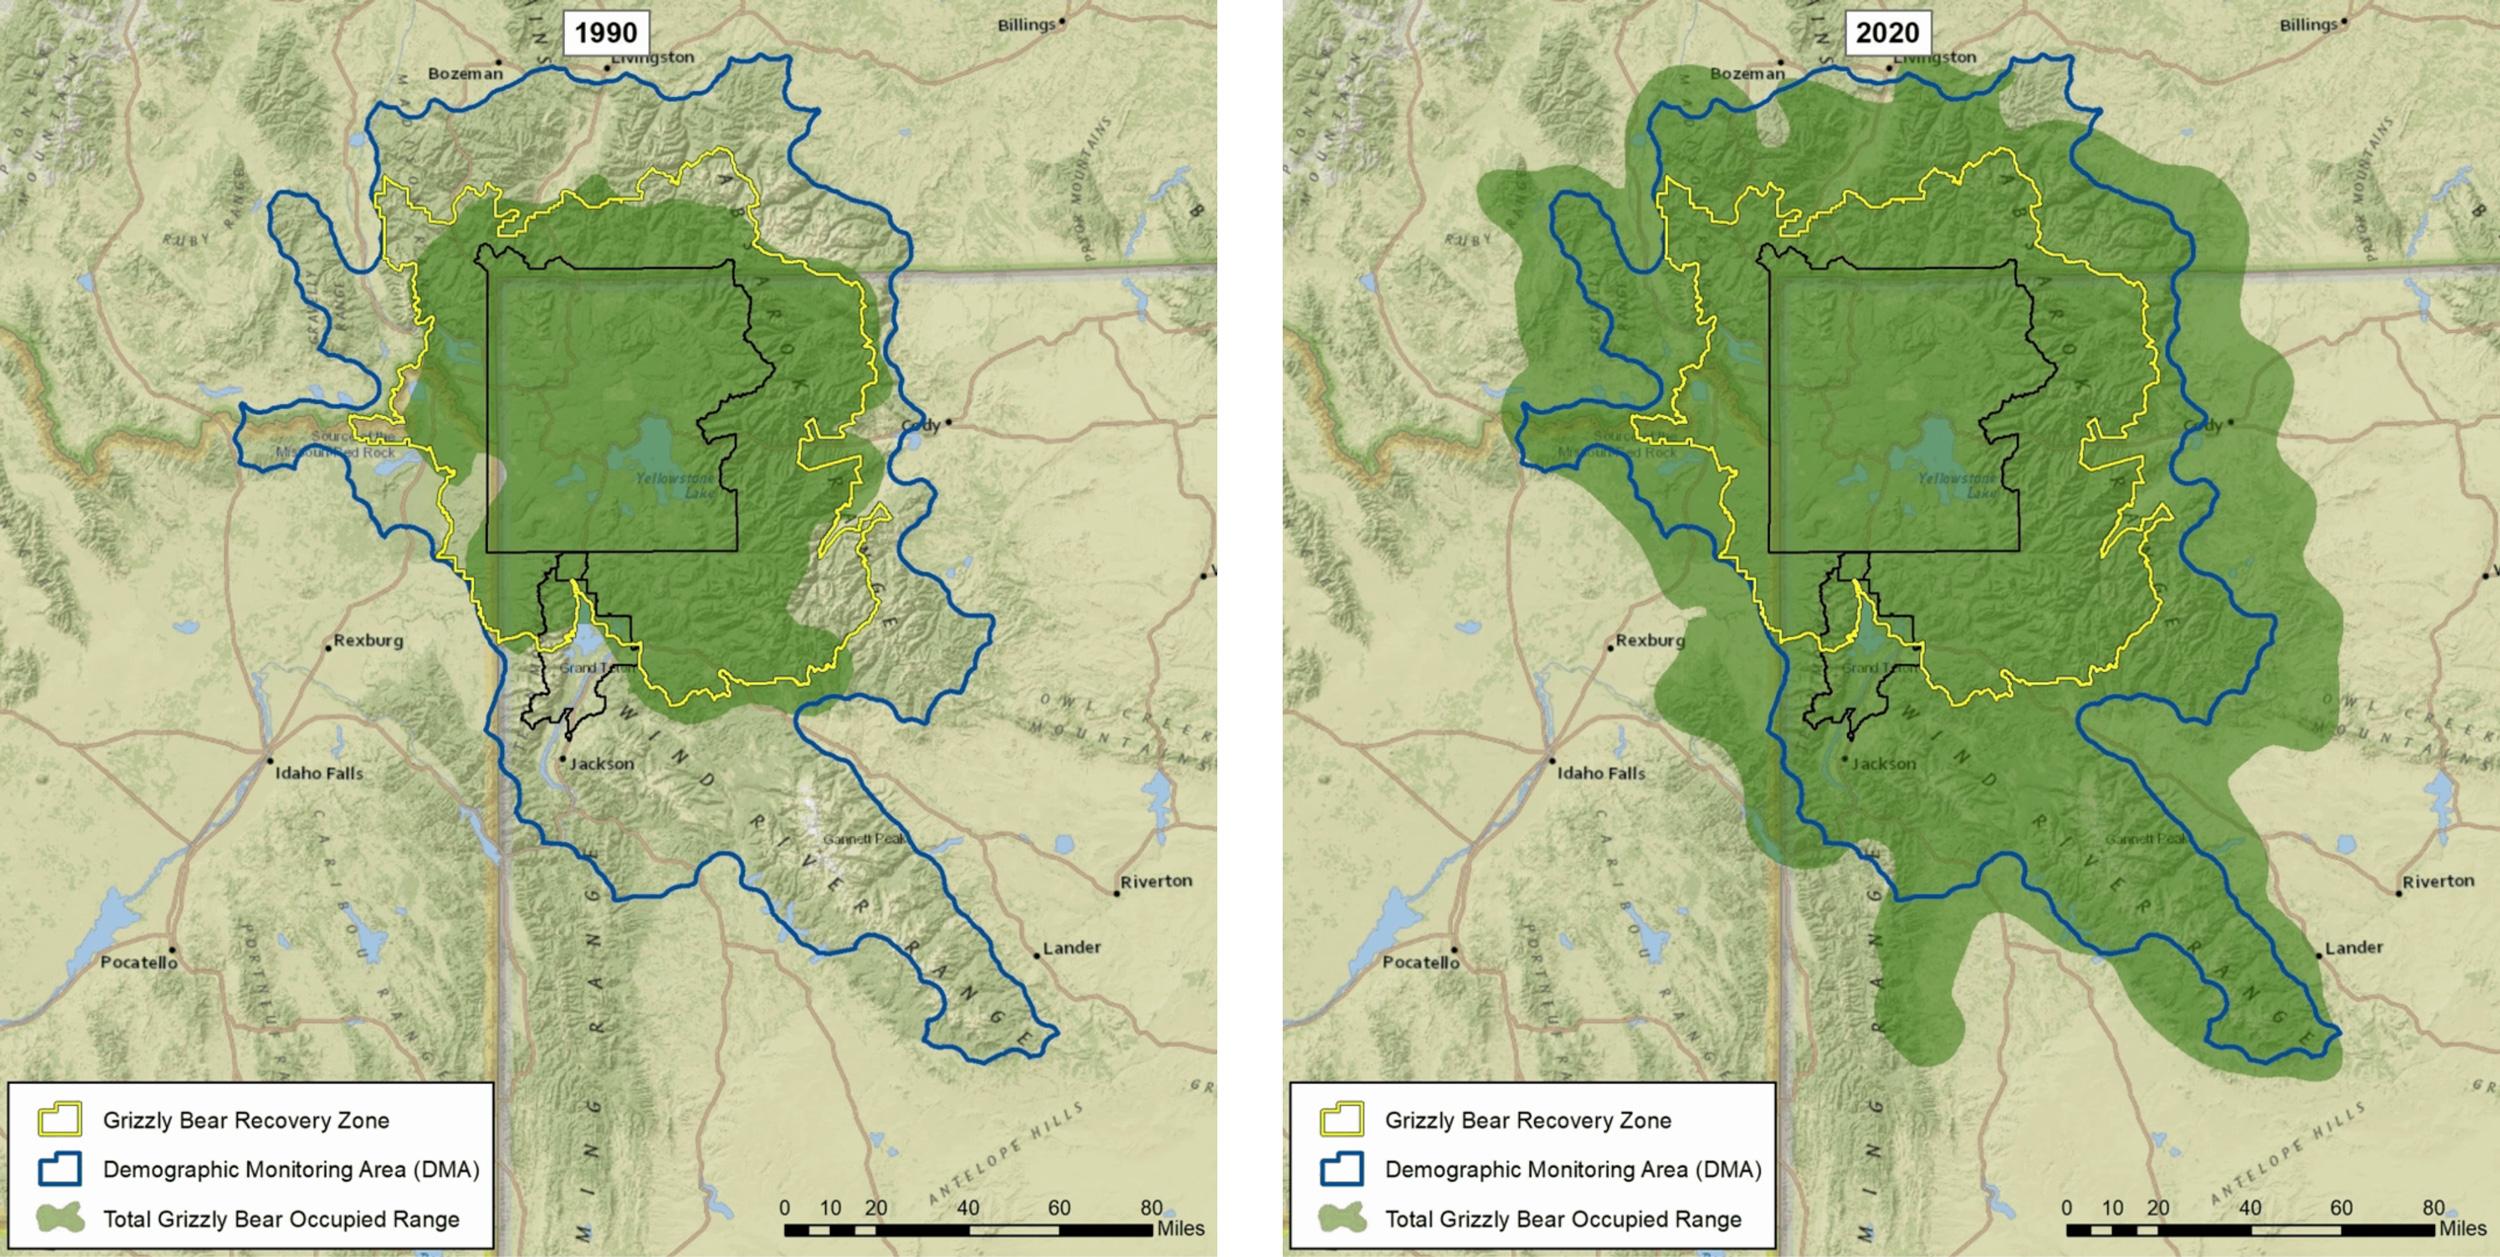
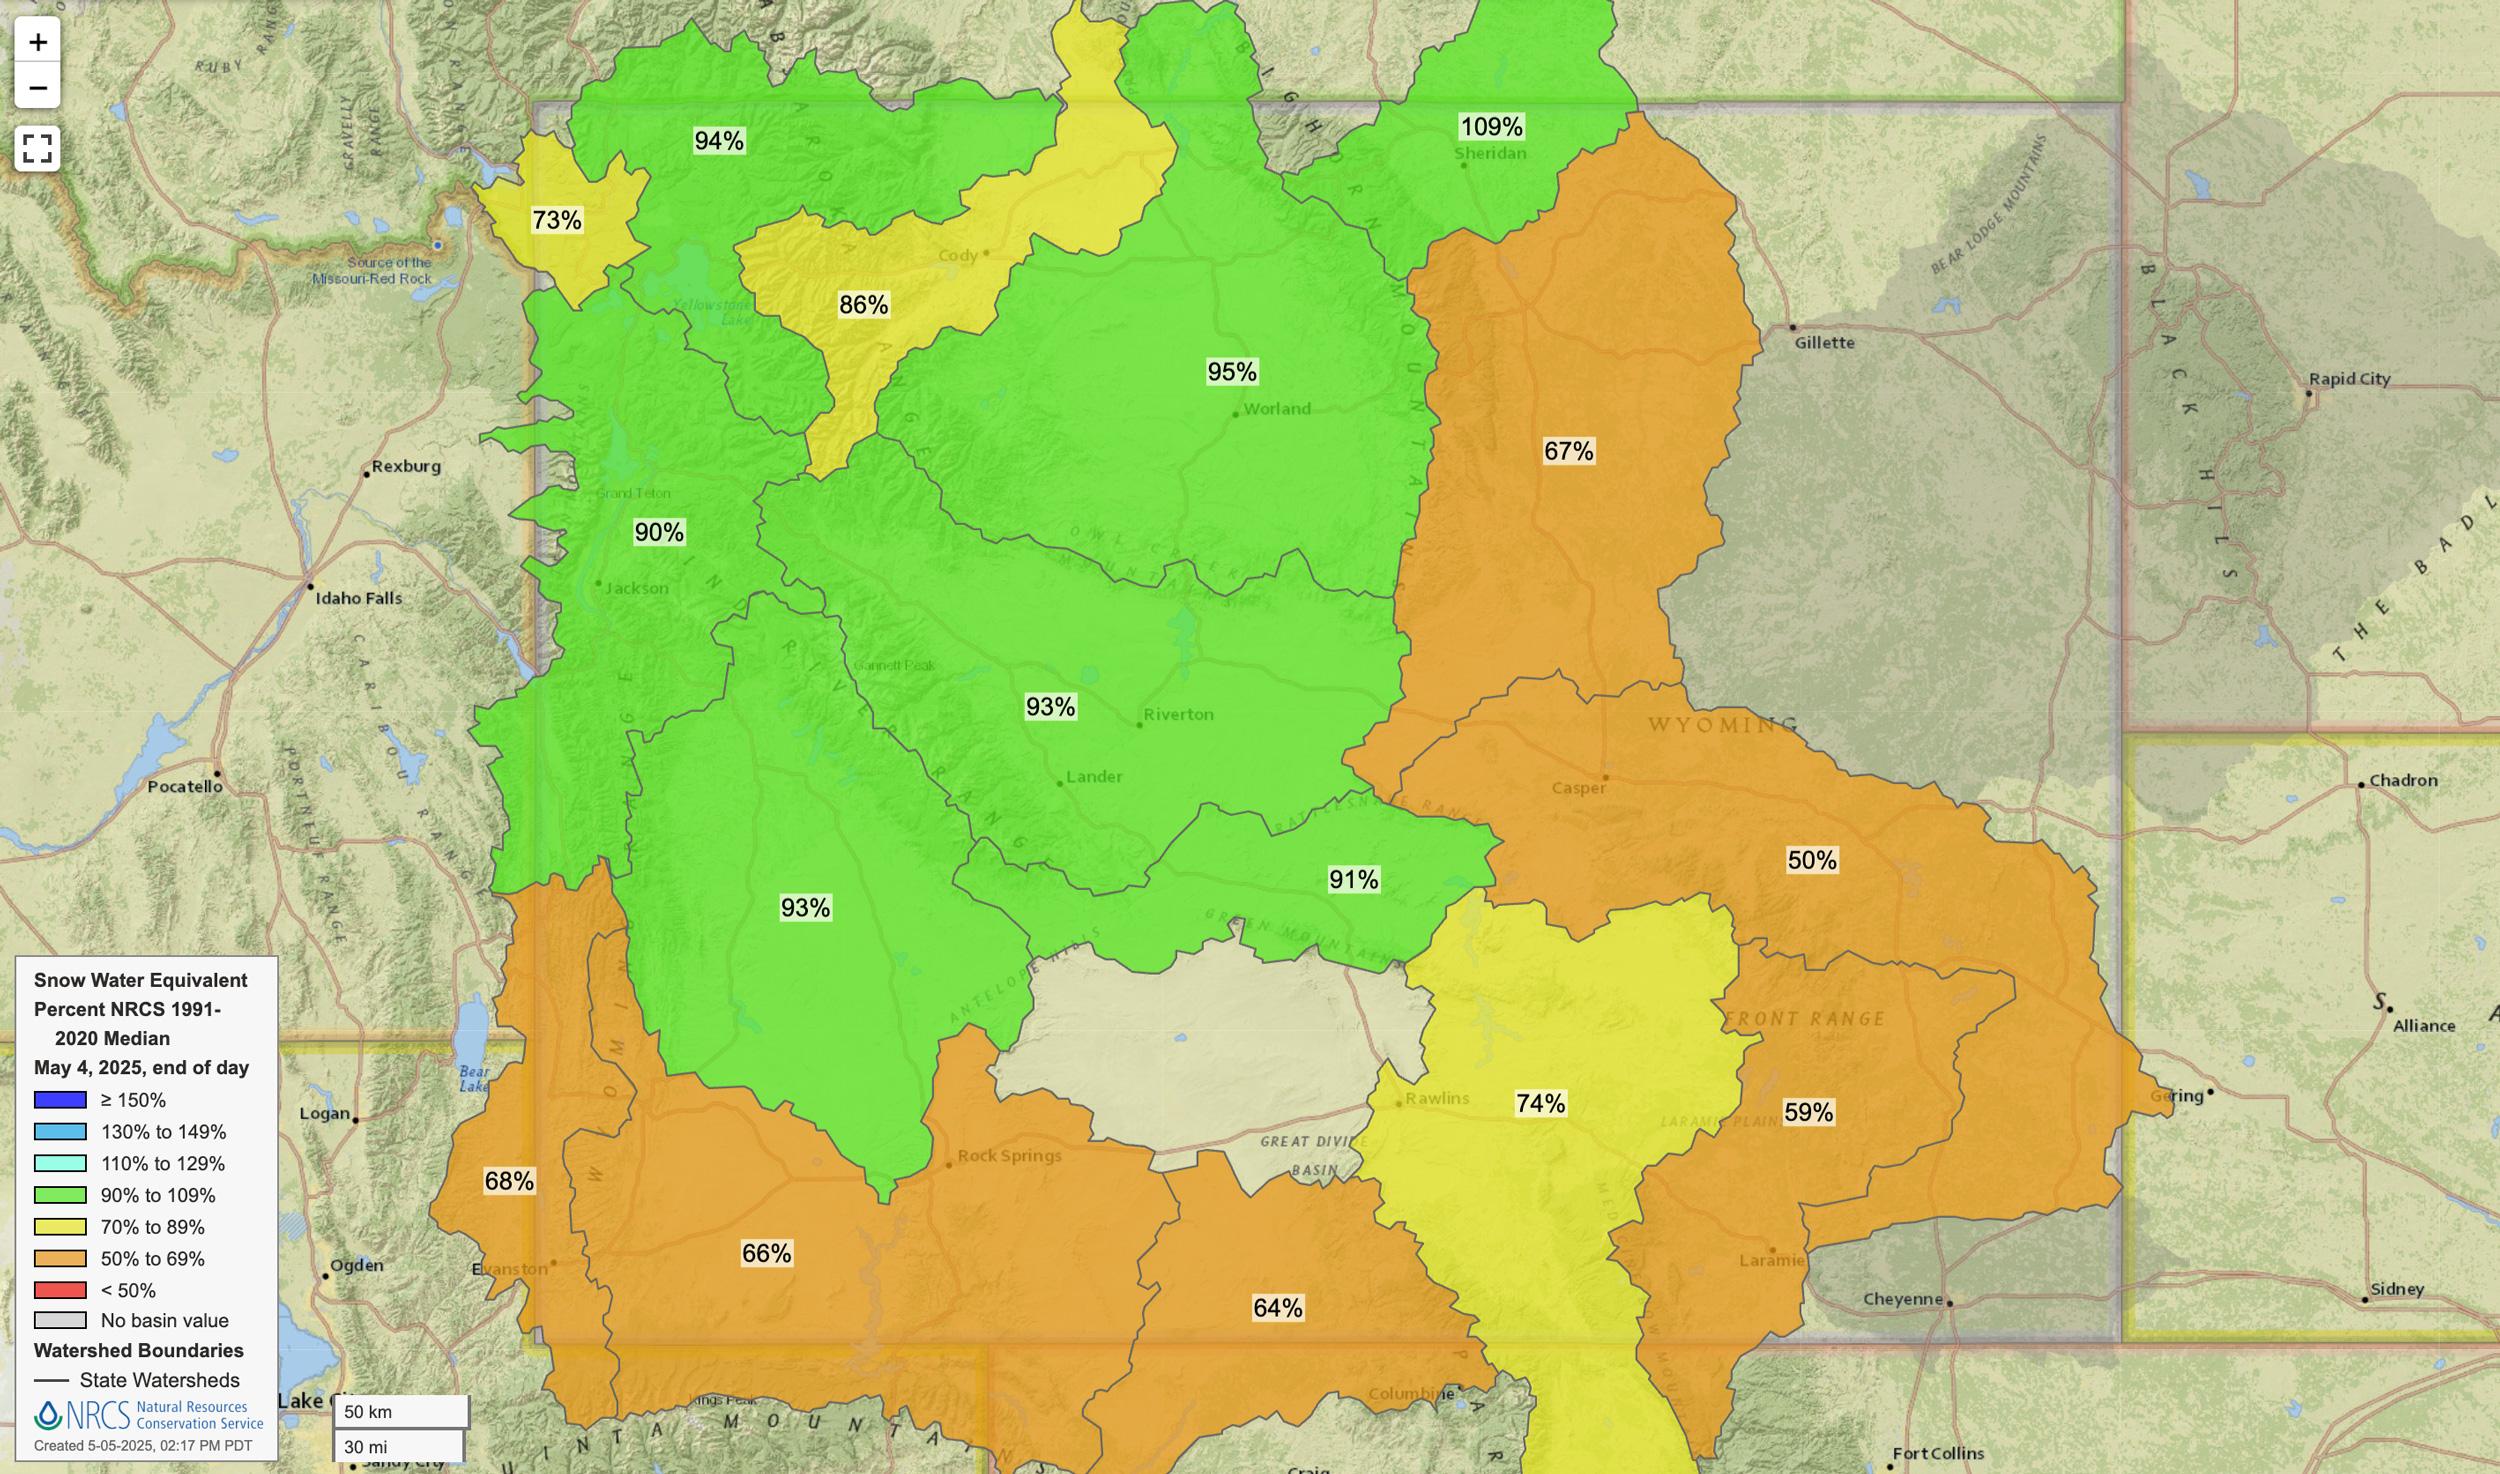
Wyoming grizzly bear range in 1990 and 2020.
Type | Type 1 and 2 |
|---|---|
Description | Antlered or any |
License fee | Full price fee |
Type | Type 3 |
Description | Antlered or any whitetail deer, full price antelope |
License fee | Full price fee |
Type | Type 4 and 5 |
Description | Antlerless |
License fee | Full price fee |
Type | Type 6 and 7 |
Description | Doe/fawn |
License fee | Reduced price fee |
Type | Type 8 |
Description | Doe/fawn whitetail deerReduced price doe/fawn antelope |
License fee | Reduced price fee |
Type | Type 9 |
Description | Archery only |
License fee | Full price fee |
Type | Type 0 |
Description | Specialty weapon only (excluding archery) |
License fee | Full price fee |
Type | Description | License fee |
|---|---|---|
Type 1 and 2 | Antlered or any | Full price fee |
Type 3 | Antlered or any whitetail deer, full price antelope | Full price fee |
Type 4 and 5 | Antlerless | Full price fee |
Type 6 and 7 | Doe/fawn | Reduced price fee |
Type 8 | Doe/fawn whitetail deerReduced price doe/fawn antelope | Reduced price fee |
Type 9 | Archery only | Full price fee |
Type 0 | Specialty weapon only (excluding archery) | Full price fee |
Region A |
Region B |
Region C |
Region D |
Region F |
Region G |
Region H |
Region J |
Region K |
Region L |
Region M |
Region Q |
Region R |
Region T |
Region W |
Region X |
Region Y |
Region A | Region B | Region C | Region D |
Region F | Region G | Region H | Region J |
Region K | Region L | Region M | Region Q |
Region R | Region T | Region W | Region X |
Region Y |
Unit/hunt |
2025 licenses |
2026 licenses |
22-type 1 |
150 |
400 |
22-type 2 |
250 |
0 |
36-type 1 |
100 |
125 |
89-type 1 |
125 |
150 |
105/106/109-type 1 |
25 |
50 |
128-type 1 |
50 |
75 |
141-type 1 |
50 |
75 |
Unit/hunt | 2025 licenses | 2026 licenses |
22-type 1 | 150 | 400 |
22-type 2 | 250 | 0 |
36-type 1 | 100 | 125 |
89-type 1 | 125 | 150 |
105/106/109-type 1 | 25 | 50 |
128-type 1 | 50 | 75 |
141-type 1 | 50 | 75 |
Area |
Trophy potential |
Harvest success |
Resident odds |
Nonresident points to draw (reg) |
Nonresident points to draw (special) |
128-Type 1 |
180”+ |
88% |
1% |
3.9% with 20 |
3.1% with 19 |
130-Type 1 |
180”+ |
100% |
.89% |
0% |
100% with 20 |
87-Type 1 |
180”+ |
93% |
2% |
0% |
0% |
101-Type 1 |
180”+ |
86% |
1.9% |
50% with 18 |
33% with 19 |
102-Type 1 |
180”+ |
89% |
2.7% |
17% with <19 |
100% with 18 |
141-Type 1 |
180”+ |
70% |
4.1% |
51% with 17 |
89% with <15 |
Region G |
190”+ |
23% |
OTC |
100% with <11 |
100% with 6 |
Region H |
180”+ |
25% |
OTC |
100% with <7 |
100% with <5 |
119-Type 1 |
170”+ |
71% |
4.9% |
30% with 18 |
100% with 17 |
119-Type 2 |
170”+ |
62% |
33% |
100% with 13 |
61% with <15 |
90-Type 1 |
170”+ |
56% |
3.4% |
38% with 16 |
100% with 17 |
117-Type 1 |
170’+ |
63% |
13% |
100% with <9 |
100% with 4 |
105/106/109-Type 1 |
170”+ |
63% |
2% |
0% |
44% with 20 |
89-Type 1 |
170”+ |
79% |
7.2% |
39% with 15 |
100% with 12 |
34-Type 1 |
170”+ |
76% |
7.2% |
100% with <15 |
100% with 13 |
110/111-Type 1 |
170”+ |
6.2% |
100% with 19 |
50% with <11 |
125-Type 1 |
170”+ |
60% |
15% |
51% with 15 |
100% with <6 |
81-Type 1 |
170”+ |
71% |
23% |
78% with 11 |
100% with 8 |
Area | Trophy potential | Harvest success | Resident odds | Nonresident points to draw (reg) | Nonresident points to draw (special) |
128-Type 1 | 180”+ | 88% | 1% | 3.9% with 20 | 3.1% with 19 |
130-Type 1 | 180”+ | 100% | .89% | 0% | 100% with 20 |
87-Type 1 | 180”+ | 93% | 2% | 0% | 0% |
101-Type 1 | 180”+ | 86% | 1.9% | 50% with 18 | 33% with 19 |
102-Type 1 | 180”+ | 89% | 2.7% | 17% with <19 | 100% with 18 |
141-Type 1 | 180”+ | 70% | 4.1% | 51% with 17 | 89% with <15 |
Region G | 190”+ | 23% | OTC | 100% with <11 | 100% with 6 |
Region H | 180”+ | 25% | OTC | 100% with <7 | 100% with <5 |
119-Type 1 | 170”+ | 71% | 4.9% | 30% with 18 | 100% with 17 |
119-Type 2 | 170”+ | 62% | 33% | 100% with 13 | 61% with <15 |
90-Type 1 | 170”+ | 56% | 3.4% | 38% with 16 | 100% with 17 |
117-Type 1 | 170’+ | 63% | 13% | 100% with <9 | 100% with 4 |
105/106/109-Type 1 | 170”+ | 63% | 2% | 0% | 44% with 20 |
89-Type 1 | 170”+ | 79% | 7.2% | 39% with 15 | 100% with 12 |
34-Type 1 | 170”+ | 76% | 7.2% | 100% with <15 | 100% with 13 |
110/111-Type 1 | 170”+ | 6.2% | 100% with 19 | 50% with <11 | |
125-Type 1 | 170”+ | 60% | 15% | 51% with 15 | 100% with <6 |
81-Type 1 | 170”+ | 71% | 23% | 78% with 11 | 100% with 8 |
Area |
Trophy potential |
Harvest success |
Resident odds |
Nonresident points to draw (reg) |
Nonresident points to draw (special) |
Region G |
190"+ |
23% unit 145 |
OTC |
100% with <11 |
100% with 6 |
Region H |
180"+ |
34% unit 152 |
OTC |
100% with <7 |
100% with <5 |
Region K |
180”+ |
31% unit 31 |
OTC |
54% with 4 |
100% with 0 |
Region D |
170”+ |
38% unit 66 |
OTC |
67% with 3 |
81% with 0 |
Region R |
160”+ |
36% unit 41 |
OTC |
59% with <3 |
84% with 0 |
Region Q |
160”+ |
45% unit 96 |
OTC |
100% with <4 |
100% with 0 |
Region L |
180"+ |
38% unit 171 |
OTC |
80% with 2 |
100% with 0 |
84-type 1 |
170"+ |
14% |
5.5% |
0% |
33% with <7 |
117-Type 1 |
170’+ |
56% |
14% |
100% with <9 |
100% with 4 |
125-Type 1 |
170"+ |
63% |
16% |
51% with 15 |
100% with <6 |
165-Type 1 |
170”+ |
50% |
37% |
100% with 9 |
64% with <1 |
120-Type 1 |
170”+ |
77% |
43% |
100% with <8 |
34% with <4 |
80-Type 1 |
170”+ |
49% |
43% |
45% with 8 |
100% with <5 |
37-Type 1 |
170”+ |
58% |
19% |
35% with 12 |
57% with 6 |
22-Type 1 |
170”+ |
63% |
47% |
19% with <7 |
56% with 4 |
118-Type 1 |
160”+ |
64% |
17% |
100% with <13 |
100% with 5 |
78-Type 1 |
160”+ |
35% |
18% |
22% with <8 |
94% with 5 |
79-type 1 |
160"+ |
44% |
51% |
100% with <5 |
100% with 0 |
36-Type 1 |
150”+ |
55% |
43% |
100% with 6 |
40% with 2 |
64-type 2 |
150"+ |
37% |
48% |
95% with <4 |
100% with 0 |
60-Type 1 |
160”+ |
75% |
11% |
100% with 5 |
100% with 0 |
Area | Trophy potential | Harvest success | Resident odds | Nonresident points to draw (reg) | Nonresident points to draw (special) |
Region G | 190"+ | 23% unit 145 | OTC | 100% with <11 | 100% with 6 |
Region H | 180"+ | 34% unit 152 | OTC | 100% with <7 | 100% with <5 |
Region K | 180”+ | 31% unit 31 | OTC | 54% with 4 | 100% with 0 |
Region D | 170”+ | 38% unit 66 | OTC | 67% with 3 | 81% with 0 |
Region R | 160”+ | 36% unit 41 | OTC | 59% with <3 | 84% with 0 |
Region Q | 160”+ | 45% unit 96 | OTC | 100% with <4 | 100% with 0 |
Region L | 180"+ | 38% unit 171 | OTC | 80% with 2 | 100% with 0 |
84-type 1 | 170"+ | 14% | 5.5% | 0% | 33% with <7 |
117-Type 1 | 170’+ | 56% | 14% | 100% with <9 | 100% with 4 |
125-Type 1 | 170"+ | 63% | 16% | 51% with 15 | 100% with <6 |
165-Type 1 | 170”+ | 50% | 37% | 100% with 9 | 64% with <1 |
120-Type 1 | 170”+ | 77% | 43% | 100% with <8 | 34% with <4 |
80-Type 1 | 170”+ | 49% | 43% | 45% with 8 | 100% with <5 |
37-Type 1 | 170”+ | 58% | 19% | 35% with 12 | 57% with 6 |
22-Type 1 | 170”+ | 63% | 47% | 19% with <7 | 56% with 4 |
118-Type 1 | 160”+ | 64% | 17% | 100% with <13 | 100% with 5 |
78-Type 1 | 160”+ | 35% | 18% | 22% with <8 | 94% with 5 |
79-type 1 | 160"+ | 44% | 51% | 100% with <5 | 100% with 0 |
36-Type 1 | 150”+ | 55% | 43% | 100% with 6 | 40% with 2 |
64-type 2 | 150"+ | 37% | 48% | 95% with <4 | 100% with 0 |
60-Type 1 | 160”+ | 75% | 11% | 100% with 5 | 100% with 0 |
Preference points |
Nonresident applicants |
1 |
36,592 |
2 |
25,614 |
3 |
22,833 |
4 |
21,215 |
5 |
17,917 |
6 |
13,635 |
7 |
10,009 |
8 |
7,033 |
9 |
5,695 |
10 |
4,419 |
11 |
3,529 |
12 |
2,654 |
13 |
2,102 |
14 |
1,893 |
15 |
1,591 |
16 |
1,406 |
17 |
1,168 |
18 |
1,082 |
19 |
937 |
20 |
1,030 |
Total |
182,354 |
Preference points | Nonresident applicants |
1 | 36,592 |
2 | 25,614 |
3 | 22,833 |
4 | 21,215 |
5 | 17,917 |
6 | 13,635 |
7 | 10,009 |
8 | 7,033 |
9 | 5,695 |
10 | 4,419 |
11 | 3,529 |
12 | 2,654 |
13 | 2,102 |
14 | 1,893 |
15 | 1,591 |
16 | 1,406 |
17 | 1,168 |
18 | 1,082 |
19 | 937 |
20 | 1,030 |
Total | 182,354 |
Unit/hunt |
2025 licenses |
2026 licenses |
6-type1 |
150 |
175 |
7-type 1 |
350 |
400 |
25-type 1 |
550 |
600 |
26-type 1 |
1,000 |
1,100 |
27-type 1 |
125 |
150 |
32-type 2 |
0 |
250 |
43-type 1 |
250 |
300 |
50-type 1 |
300 |
375 |
50-type 0 |
50 |
75 |
51-type 1 |
100 |
125 |
52-type 1 |
75 |
125 |
52-type 2 |
75 |
150 |
59-type 1 |
150 |
200 |
62-type 1 |
25 |
100 |
63-type 1 |
50 |
100 |
63-type 2 |
50 |
75 |
64-type 1 |
100 |
150 |
67-type 1 |
175 |
200 |
68-type 1 |
200 |
250 |
69-type 1 |
75 |
100 |
73-type 1 |
400 |
500 |
75-type 1 |
250 |
275 |
84-type 2 |
0 |
50 |
86-type 1 |
0 |
10 |
87-type 1 |
20 |
45 |
89-type 1 |
20 |
40 |
89-type 2 |
20 |
25 |
90-type 1 |
35 |
60 |
91-type 1 |
125 |
200 |
91-type 2 |
0 |
25 |
92-type 1 |
200 |
225 |
96-type 1 |
75 |
125 |
99-type 1 |
125 |
150 |
101-type 1 |
35 |
50 |
106-type 1 |
100 |
125 |
107-type 1 |
75 |
100 |
108-type 1 |
25 |
75 |
Unit/hunt | 2025 licenses | 2026 licenses |
6-type1 | 150 | 175 |
7-type 1 | 350 | 400 |
25-type 1 | 550 | 600 |
26-type 1 | 1,000 | 1,100 |
27-type 1 | 125 | 150 |
32-type 2 | 0 | 250 |
43-type 1 | 250 | 300 |
50-type 1 | 300 | 375 |
50-type 0 | 50 | 75 |
51-type 1 | 100 | 125 |
52-type 1 | 75 | 125 |
52-type 2 | 75 | 150 |
59-type 1 | 150 | 200 |
62-type 1 | 25 | 100 |
63-type 1 | 50 | 100 |
63-type 2 | 50 | 75 |
64-type 1 | 100 | 150 |
67-type 1 | 175 | 200 |
68-type 1 | 200 | 250 |
69-type 1 | 75 | 100 |
73-type 1 | 400 | 500 |
75-type 1 | 250 | 275 |
84-type 2 | 0 | 50 |
86-type 1 | 0 | 10 |
87-type 1 | 20 | 45 |
89-type 1 | 20 | 40 |
89-type 2 | 20 | 25 |
90-type 1 | 35 | 60 |
91-type 1 | 125 | 200 |
91-type 2 | 0 | 25 |
92-type 1 | 200 | 225 |
96-type 1 | 75 | 125 |
99-type 1 | 125 | 150 |
101-type 1 | 35 | 50 |
106-type 1 | 100 | 125 |
107-type 1 | 75 | 100 |
108-type 1 | 25 | 75 |
Unit/hunt |
2025 licenses |
2026 licenses |
2-type 1 |
150 |
125 |
9-type 1 |
300 |
250 |
32-type 1 |
700 |
550 |
99-type 0 |
25 |
0 |
109-type 1 |
250 |
200 |
Unit/hunt | 2025 licenses | 2026 licenses |
2-type 1 | 150 | 125 |
9-type 1 | 300 | 250 |
32-type 1 | 700 | 550 |
99-type 0 | 25 | 0 |
109-type 1 | 250 | 200 |
Area |
Trophy potential |
Harvest success |
Resident odds |
Nonresident points to draw (regular) |
Nonresident points to draw (special) |
61-Type 1 |
80”+ |
80% |
16% |
87% with 17 |
69% with <15 |
60-Type 1 |
80”+ |
66% |
7.7% |
66% with 20 |
68% with 17 |
58-Type 1 |
80”+ |
77% |
10% |
67% with 18 |
100% with 16 |
92-Type 1 |
80”+ |
90% |
14% |
100% with <16 |
53% with <13 |
112-Type 1 |
80”+ |
62% |
12% |
67% with <17 |
50% with 12 |
114-Type 1 |
80”+ |
66% |
14% |
51% with 16 |
100% with 10 |
64-Type 1 |
80”+ |
75% |
16% |
76% with <16 |
78% with 11 |
57-Type 1 |
75”+ |
85% |
8.1% |
100% with 13 |
23% with 8 |
57-type 2 |
75"+ |
84% |
33% |
100% with 8 |
100% with 9 |
67-Type 1 |
80”+ |
88% |
21% |
100% with <13 |
100% with <7 |
68- type 1 |
80"+ |
95% |
17% |
14% with 12 |
53% with 10 |
101-Type 1 |
80”+ |
74% |
12% |
51% with 14 |
67% with <11 |
91-Type 1 |
80”+ |
93% |
17% |
100% with <12 |
34% with 8 |
52-Type 1 |
75”+ |
70% |
14% |
26% with <12 |
100% with 9 |
75-Type 1 |
80”+ |
85% |
22% |
41% with <11 |
25% with 7 |
78-Type 1 |
75”+ |
93% |
7.9% |
64% with <12 |
100% with 8 |
77-Type 1 |
75”+ |
87% |
18% |
100% with 11 |
56% with <7 |
96-Type 1 |
75”+ |
82% |
14% |
100% with 10 |
100% with <10 |
76-Type 1 |
75”+ |
88% |
32% |
100% with <10 |
71% with <7 |
83-Type 1 |
75”+ |
84% |
19% |
52% with <10 |
29% with 5 |
80-Type 1 |
80”+ |
90% |
14% |
77% with 11 |
100% with 7 |
79-Type 9 |
80”+ |
71% |
25% |
100% with 7 |
39% with 5 |
Area | Trophy potential | Harvest success | Resident odds | Nonresident points to draw (regular) | Nonresident points to draw (special) |
61-Type 1 | 80”+ | 80% | 16% | 87% with 17 | 69% with <15 |
60-Type 1 | 80”+ | 66% | 7.7% | 66% with 20 | 68% with 17 |
58-Type 1 | 80”+ | 77% | 10% | 67% with 18 | 100% with 16 |
92-Type 1 | 80”+ | 90% | 14% | 100% with <16 | 53% with <13 |
112-Type 1 | 80”+ | 62% | 12% | 67% with <17 | 50% with 12 |
114-Type 1 | 80”+ | 66% | 14% | 51% with 16 | 100% with 10 |
64-Type 1 | 80”+ | 75% | 16% | 76% with <16 | 78% with 11 |
57-Type 1 | 75”+ | 85% | 8.1% | 100% with 13 | 23% with 8 |
57-type 2 | 75"+ | 84% | 33% | 100% with 8 | 100% with 9 |
67-Type 1 | 80”+ | 88% | 21% | 100% with <13 | 100% with <7 |
68- type 1 | 80"+ | 95% | 17% | 14% with 12 | 53% with 10 |
101-Type 1 | 80”+ | 74% | 12% | 51% with 14 | 67% with <11 |
91-Type 1 | 80”+ | 93% | 17% | 100% with <12 | 34% with 8 |
52-Type 1 | 75”+ | 70% | 14% | 26% with <12 | 100% with 9 |
75-Type 1 | 80”+ | 85% | 22% | 41% with <11 | 25% with 7 |
78-Type 1 | 75”+ | 93% | 7.9% | 64% with <12 | 100% with 8 |
77-Type 1 | 75”+ | 87% | 18% | 100% with 11 | 56% with <7 |
96-Type 1 | 75”+ | 82% | 14% | 100% with 10 | 100% with <10 |
76-Type 1 | 75”+ | 88% | 32% | 100% with <10 | 71% with <7 |
83-Type 1 | 75”+ | 84% | 19% | 52% with <10 | 29% with 5 |
80-Type 1 | 80”+ | 90% | 14% | 77% with 11 | 100% with 7 |
79-Type 9 | 80”+ | 71% | 25% | 100% with 7 | 39% with 5 |
Area |
Trophy potential |
Harvest success |
Resident odds |
Nonresident points to draw (regular) |
Nonresident points to draw (special) |
62-type 1 |
80"+ |
67% |
8.8% |
100% with 18 |
100% with 5 |
63-Type 1 |
75"+ |
75% |
17% |
100% with 14 |
100% with 2 |
52-Type 1 |
70"+ |
70% |
14% |
26% with <12 |
100% with 9 |
66-Type 1 |
75”+ |
85% |
26% |
100% with <10 |
19% with 6 |
48-Type 1 |
80"+ |
88% |
42% |
37% with 9 |
100% with 3 |
63-Type 2 |
75”+ |
78% |
31% |
100% with 9 |
100% with <8 |
27-Type 1 |
75”+ |
95% |
18% |
51% with <9 |
50% with <7 |
48-Type 2 |
80”+ |
90% |
63% |
78% with <9 |
91% with 6 |
47-Type 2 |
75”+ |
89% |
52% |
76% with 8 |
37% with 4 |
47-Type 1 |
75”+ |
83% |
38% |
100% with 8 |
24% with <6 |
57-Type 2 |
70”+ |
96% |
33% |
100% with 8 |
100% with 9 |
32-Type 1 |
75”+ |
88% |
39% |
39% with <8 |
31% with 5 |
81-Type 1 |
70”+ |
90% |
17% |
42% with <8 |
90% with 5 |
29-Type 1 |
70”+ |
96% |
36% |
68% with <8 |
38% with 4 |
82-Type 2 |
70”+ |
91% |
48% |
38% with <8 |
75% with <4 |
50-Type 1 |
70”+ |
86% |
44% |
100% with <8 |
51% with <4 |
82-Type 1 |
70”+ |
85% |
28% |
52% with 7 |
100% with 5 |
79-Type 9 |
80”+ |
71% |
25% |
100% with 7 |
39% with 5 |
42-Type 1 |
70”+ |
84% |
62% |
30% with <7 |
49% with 2 |
51-Type 1 |
70”+ |
86% |
34% |
100% with <7 |
100% with <5 |
5-Type 1 |
70”+ |
77% |
43% |
100% with 6 |
43% with <3 |
21-Type 1 |
70”+ |
68% |
100% |
63% with 6 |
100% with <3 |
31-Type 1 |
70”+ |
87% |
47% |
30% with 6 |
100% with 2 |
46-Type 1 |
75”+ |
83% |
100% |
81% with 6 |
100% with 1 |
50-Type 0 |
70”+ |
82% |
76% |
62% with 6 |
100% with 0 |
43-Type 1 |
70”+ |
92% |
100% |
15% with <6 |
48% with <4 |
46-Type 2 |
75”+ |
85% |
100% |
38% with <6 |
29% with 2 |
38-Type 1 |
70”+ |
81% |
46% |
32% with 5 |
34% with 3 |
45-Type 1 |
70”+ |
82% |
74% |
85% with 5 |
88% with 2 |
38-Type 2 |
70”+ |
87% |
84% |
93% with <5 |
67% with <4 |
6-Type 1 |
70”+ |
96% |
100% |
42% with <5 |
100% with 3 |
9-Type 1 |
70”+ |
85% |
100% |
100% with <5 |
72% with 2 |
17-Type 1 |
70”+ |
78% |
100% |
100% with <5 |
100% with <2 |
25-Type 1 |
70”+ |
77% |
100% |
100% with <5 |
72% with 1 |
16-Type 1 |
70”+ |
72% |
100% |
53% with <5 |
31% with 1 |
11-Type 1 |
70”+ |
72% |
96% |
38% with 4 |
66% with 1 |
1-Type 1 |
70”+ |
89% |
100% |
29% with <3 |
100% with 0 |
8-Type 1 |
70”+ |
94% |
100% |
22% with <3 |
100% with 0 |
Area | Trophy potential | Harvest success | Resident odds | Nonresident points to draw (regular) | Nonresident points to draw (special) |
62-type 1 | 80"+ | 67% | 8.8% | 100% with 18 | 100% with 5 |
63-Type 1 | 75"+ | 75% | 17% | 100% with 14 | 100% with 2 |
52-Type 1 | 70"+ | 70% | 14% | 26% with <12 | 100% with 9 |
66-Type 1 | 75”+ | 85% | 26% | 100% with <10 | 19% with 6 |
48-Type 1 | 80"+ | 88% | 42% | 37% with 9 | 100% with 3 |
63-Type 2 | 75”+ | 78% | 31% | 100% with 9 | 100% with <8 |
27-Type 1 | 75”+ | 95% | 18% | 51% with <9 | 50% with <7 |
48-Type 2 | 80”+ | 90% | 63% | 78% with <9 | 91% with 6 |
47-Type 2 | 75”+ | 89% | 52% | 76% with 8 | 37% with 4 |
47-Type 1 | 75”+ | 83% | 38% | 100% with 8 | 24% with <6 |
57-Type 2 | 70”+ | 96% | 33% | 100% with 8 | 100% with 9 |
32-Type 1 | 75”+ | 88% | 39% | 39% with <8 | 31% with 5 |
81-Type 1 | 70”+ | 90% | 17% | 42% with <8 | 90% with 5 |
29-Type 1 | 70”+ | 96% | 36% | 68% with <8 | 38% with 4 |
82-Type 2 | 70”+ | 91% | 48% | 38% with <8 | 75% with <4 |
50-Type 1 | 70”+ | 86% | 44% | 100% with <8 | 51% with <4 |
82-Type 1 | 70”+ | 85% | 28% | 52% with 7 | 100% with 5 |
79-Type 9 | 80”+ | 71% | 25% | 100% with 7 | 39% with 5 |
42-Type 1 | 70”+ | 84% | 62% | 30% with <7 | 49% with 2 |
51-Type 1 | 70”+ | 86% | 34% | 100% with <7 | 100% with <5 |
5-Type 1 | 70”+ | 77% | 43% | 100% with 6 | 43% with <3 |
21-Type 1 | 70”+ | 68% | 100% | 63% with 6 | 100% with <3 |
31-Type 1 | 70”+ | 87% | 47% | 30% with 6 | 100% with 2 |
46-Type 1 | 75”+ | 83% | 100% | 81% with 6 | 100% with 1 |
50-Type 0 | 70”+ | 82% | 76% | 62% with 6 | 100% with 0 |
43-Type 1 | 70”+ | 92% | 100% | 15% with <6 | 48% with <4 |
46-Type 2 | 75”+ | 85% | 100% | 38% with <6 | 29% with 2 |
38-Type 1 | 70”+ | 81% | 46% | 32% with 5 | 34% with 3 |
45-Type 1 | 70”+ | 82% | 74% | 85% with 5 | 88% with 2 |
38-Type 2 | 70”+ | 87% | 84% | 93% with <5 | 67% with <4 |
6-Type 1 | 70”+ | 96% | 100% | 42% with <5 | 100% with 3 |
9-Type 1 | 70”+ | 85% | 100% | 100% with <5 | 72% with 2 |
17-Type 1 | 70”+ | 78% | 100% | 100% with <5 | 100% with <2 |
25-Type 1 | 70”+ | 77% | 100% | 100% with <5 | 72% with 1 |
16-Type 1 | 70”+ | 72% | 100% | 53% with <5 | 31% with 1 |
11-Type 1 | 70”+ | 72% | 96% | 38% with 4 | 66% with 1 |
1-Type 1 | 70”+ | 89% | 100% | 29% with <3 | 100% with 0 |
8-Type 1 | 70”+ | 94% | 100% | 22% with <3 | 100% with 0 |
Area |
Trophy potential |
Harvest success |
Public land percentage |
Nonresident special second choice odds |
50-Type 0 |
70”+ |
82% |
62.5% |
10% |
1-Type 1 |
70"+ |
89% |
20.7% |
100% |
2-Type 1 |
70”+ |
77% |
23.2% |
100% |
3-Type 1 |
70”+ |
82% |
18.7% |
100% |
8-Type 1 |
70”+ |
94% |
19.2% |
79% |
10-Type 1 |
70”+ |
96% |
13.3% |
100% |
15-Type 1 |
70”+ |
69% |
16.2% |
100% |
19-Type 1 |
70”+ |
81% |
16% |
100% |
30-Type 1 |
70”+ |
90% |
28.9% |
50% |
37-Type 1 |
70”+ |
79% |
13.4% |
100% |
20-Type 1 |
70”+ |
60% |
40% |
100% |
46-Type 1 |
75"+ |
83% |
27.1% |
100% |
70-Type 1 |
70”+ |
89% |
21.9% |
100% |
22-Type 1 |
70”+ |
79% |
23.3% |
100% |
23-Type 1 |
70”+ |
78% |
14.1% |
100% |
24-Type 1 |
70”+ |
85% |
18.4% |
100% |
26-Type 1 |
70”+ |
92% |
14.9% |
100% |
113-Type 1 |
70”+ |
51% |
43.5% |
10% |
113-Type 2 |
70”+ |
69% |
43.5% |
100% |
102-Type 1 |
70”+ |
60% |
67% |
33% |
111-Type 1 |
70”+ |
89% |
7% |
100% |
109-Type 1 |
70”+ |
51% |
10.3% |
100% |
Area | Trophy potential | Harvest success | Public land percentage | Nonresident special second choice odds |
50-Type 0 | 70”+ | 82% | 62.5% | 10% |
1-Type 1 | 70"+ | 89% | 20.7% | 100% |
2-Type 1 | 70”+ | 77% | 23.2% | 100% |
3-Type 1 | 70”+ | 82% | 18.7% | 100% |
8-Type 1 | 70”+ | 94% | 19.2% | 79% |
10-Type 1 | 70”+ | 96% | 13.3% | 100% |
15-Type 1 | 70”+ | 69% | 16.2% | 100% |
19-Type 1 | 70”+ | 81% | 16% | 100% |
30-Type 1 | 70”+ | 90% | 28.9% | 50% |
37-Type 1 | 70”+ | 79% | 13.4% | 100% |
20-Type 1 | 70”+ | 60% | 40% | 100% |
46-Type 1 | 75"+ | 83% | 27.1% | 100% |
70-Type 1 | 70”+ | 89% | 21.9% | 100% |
22-Type 1 | 70”+ | 79% | 23.3% | 100% |
23-Type 1 | 70”+ | 78% | 14.1% | 100% |
24-Type 1 | 70”+ | 85% | 18.4% | 100% |
26-Type 1 | 70”+ | 92% | 14.9% | 100% |
113-Type 1 | 70”+ | 51% | 43.5% | 10% |
113-Type 2 | 70”+ | 69% | 43.5% | 100% |
102-Type 1 | 70”+ | 60% | 67% | 33% |
111-Type 1 | 70”+ | 89% | 7% | 100% |
109-Type 1 | 70”+ | 51% | 10.3% | 100% |
Preference points |
Nonresidents |
1 |
38,862 |
2 |
27,175 |
3 |
25,205 |
4 |
23,828 |
5 |
20,719 |
6 |
15,106 |
7 |
11,149 |
8 |
7,538 |
9 |
5,533 |
10 |
3,936 |
11 |
2,936 |
12 |
2,220 |
13 |
1,780 |
14 |
1,337 |
15 |
942 |
16 |
702 |
17 |
532 |
18 |
373 |
19 |
317 |
20 |
309 |
Total |
188,499 |
Preference points | Nonresidents |
1 | 38,862 |
2 | 27,175 |
3 | 25,205 |
4 | 23,828 |
5 | 20,719 |
6 | 15,106 |
7 | 11,149 |
8 | 7,538 |
9 | 5,533 |
10 | 3,936 |
11 | 2,936 |
12 | 2,220 |
13 | 1,780 |
14 | 1,337 |
15 | 942 |
16 | 702 |
17 | 532 |
18 | 373 |
19 | 317 |
20 | 309 |
Total | 188,499 |
Note: The application deadline for Wyoming deer and antelope is June 1, 2026, at 11:59 p.m. MT. You can Apply online here.
GOHUNT Insiders can research draw odds for female species within their account. Log into your account, hover over the Insider icon in the header bar. When the pop-up box appears, click on the “draw odds” link near the top of the box. Next, select Wyoming as the state and then either resident or nonresident regular draw as your residency. When the list of species appears, scroll down towards the bottom to find antlerless deer and doe/fawn antelope.
View important information and an overview of the Wyoming rules/regulations, the draw system, SuperTag and SuperTag Trifecta, tag and license fees and an interactive boundary line map on our State Profile. You can also view the Wyoming Species Profiles to access historical and statistical data to help you find trophy areas.
*Applicants must front the entire cost of the licenses they apply for. There is also a 2.5% processing fee to the total amount. *Archery license is $72 for nonresidents and $16 for residents. *Reduced price licenses are valid for doe/fawn deer and antelope.
Note: The Wyoming Game and Fish Commissioners just voted to increase the cost of nonresident preference points for deer, elk, and antelope to $75 per species going into 2027. For this year, the cost will remain the same, but on Jan 1, 2027, the price increase will take effect.
Every year, we talk to nonresident applicants who unknowingly select a license for an area that is mostly or entirely within a Designated Wilderness Area (DWA). Before applying, it’s crucial to understand that nonresidents are not allowed to hunt within a DWA on their own; they must be accompanied by a licensed Wyoming outfitter or a licensed Wyoming resident guide. A DWA is a designation by the United States Forest Service (USFS). If a Wyoming resident is willing to guide you into the DWA, they must visit a WGFD office in person to obtain a resident guide license. This cannot be done online.
A Wilderness Study Area (WSA) is a BLM designation, and a nonresident can hunt those areas without a guide.
Before applying, be aware that there are large tracts of USFS DWAs in many hunt areas. Use the GOHUNT Maps platform to upload hunt areas, land ownership, and wilderness layers to review areas with DWAs. Hunting within many of the DWAs can be very good, but if you plan to apply and draw a hunt for one of these areas, you should have an agreement with a guide/outfitter or a plan to hunt with a Wyoming resident at your side. Please do some research and apply accordingly.
Since 2000, the grizzly population has continued to grow and expand well beyond the Grizzly Bear Recovery Zone. From 1990 to 2022, the area of occupied range has increased steadily at a rate of 3.65% per year with a high of 27, 208 square miles occupied by grizzly bears in 2020. Since then, the Greater Yellowstone grizzly population is said to be stagnating geographically. Managers are suggesting that it is related to bears saturating suitable habitat where they are tolerated. They are also suggesting that occupied habitat may have declined in the last two years, even though the population has increased slightly. The estimated population, as of 2025, was 1,050 bears throughout the Greater Yellowstone Ecosystem, which is centered by Yellowstone National Park and the surrounding areas of Idaho, Montana, and south/southeast into Wyoming. This estimate is almost three times larger than the time at which grizzlies were listed as threatened under the Endangered Species Act.
The potential for hunter conflict is a real cause for concern, especially on or near a carcass. If hunting in occupied grizzly bear areas is something you do not want to do, please do some research and apply for areas where that is not an issue. Grizzly bears primarily occupy the ranges in and around Yellowstone National Park and southeast down into the Wind River Range. The Bighorn Mountains and the Medicine Bow Mountains are currently unoccupied, according to the data. Those areas, as well as the rolling grass and sage steppe throughout the central part of the state, are your best options if you truly want to avoid conflict. See the map below for estimated grizzly bear range.
Wyoming’s draw system for resident deer and antelope is completely random with no point system. Residents can also purchase general season deer licenses over-the-counter (OTC).
Nonresidents are allocated 20% of the licenses, while residents are allocated the remaining 80% of the licenses. Nonresident licenses are split in a couple of different ways. Nonresident licenses are split into two draws: a regular draw and a special draw. The nonresident regular draw is allocated 60% of the nonresident licenses. The special draw is allocated 40% of the nonresident licenses. The licenses, once drawn, are identical; however, the cost of the special license is over $800 more than the regular license. The trade-off for paying the higher cost of the special license is that fewer people are generally willing to pay the higher price, and the odds of drawing are better in many cases.
In both the regular and special draw, 75% of the licenses are guaranteed to nonresident applicants who apply with the most preference points for any given hunt. The remaining 25% of the licenses are randomly drawn with the remaining applicants for any given hunt with no weight given to the number of points each applicant has. There must be a minimum of four nonresident licenses available for one to be allocated to an applicant in the random draw. When looking at the Insider standalone draw odds, if there is some percentage displayed throughout the preference point values, it indicates that there were enough licenses that some were randomly allocated. If you apply and there are at least four nonresident licenses available, you have a random chance to draw.
Nonresidents who apply in the draw and are unsuccessful do not automatically receive a preference point. This is uncommon in most Western states. In Wyoming, if you are unsuccessful in the draw, you still have to visit the Wyoming Game and Fish Department (WGFD) website from July 1 through Nov 2, 2026, to purchase those preference points. Preference points are species-specific. You cannot use deer preference points for antelope or vice versus.
Wyoming allows applicants to apply for up to three hunt choices. They consider every applicant's first choice before moving to any applicant’s second choice. You will only lose your preference points if you draw your first choice. If you draw a second or third choice, you will retain your points and will draw the license. If you draw a license as a second and third choice, you can then also purchase a preference point in the summer point only time frame for that year.
To review your draw odds as a second choice, open the standalone draw odds, select Wyoming, your desired residency, and then, within the filters on the right portion of the page, change the “choice” drop-down from first to second. That will show you the odds of all hunts as a second choice on your application.
Wyoming categorizes its hunting licenses by type.
Type 1 and 2 licenses are full-priced any weapon licenses, but those hunts can also be hunted with a bow during the special archery season. The license holder just needs to buy the OTC archery stamp to hunt during those early season archery dates. If you buy the stamp and bowhunt and are unsuccessful in your efforts, you can still return to hunt during the rifle hunt and fill your license then. Be sure to review the current regulations for specific dates and units that allow that opportunity. The nonresident archery stamp is $72.
Wyoming will allow up to six people to apply on a party application for deer and antelope. Residents and nonresidents cannot apply together in a party application. Party applications have their preference points averaged out to the fourth decimal point. For example, a party application of three hunters with nine, five and two preference points will go into the draw with 5.3333 points (9 + 5 + 2 = 16/3 = 5.3333). The party is treated as a single application and, if it’s drawn, all members of the party will receive a license. Wyoming will allocate permits over the hunt quota to cover a party application, so there is no decrease in odds for group applications.
WGFD conducts a second draw for leftover deer and antelope licenses that remain after the initial drawing. There is no cost to apply and no point system. Your preference points will not be impacted by applying and drawing in the second leftover draw.
The application period for leftover deer and antelope drawing is likely to be between June 22 to 26, 2026.
Results of the leftover drawing will be available by early July, and licenses remaining after that will go on sale on a first-come, first-served basis a few days later.
Wyoming is a great mule deer state — and arguably one of the most sought-after opportunities in the West over the last several decades. It offers classic alpine basins, aspen/conifer, rolling mid-elevation chaparral, and wide open sage and grasslands, all of which are good mule deer habitat. It’s also well known for producing trophy caliber bucks. In more recent years, the biggest headline in regard to Wyoming mule deer has been the declining herds — most notably the winter kill of 2022/2023. There were portions of the state that reportedly lost 90+% of the fawn crop and as many as 50% of the adult populations. That was mostly confined to the southwestern portion of the state in Regions G and H. While the rest of the state fared better, that winter, drought and the increase in wolves and bears has taken a toll on deer herds statewide.
Overall, Wyoming's deer herds have struggled. When comparing populations, mule deer have been reduced by approximately two-thirds in Wyoming over the last three decades. However, I am hearing reports that, last year, hunters were seeing some great bucks on the landscape in areas where the winterkill was highest in 2022/2023. In addition, harvest success was better in 2025 when compared to 2024. Weather conditions have been favorable over the last three years, resulting in good survival and an improving population through much of wester Wyoming. Central and eastern Wyoming has not fared as well, due to the fact that much of that country is lower in elevation and lacks the good summer range that the western part of the state offers. In those areas, drought is definitely hurting recruitment and population growth.
The real elephant in the room is should you apply and burn your points in the historically renowned region G or H. It's hard to pinpoint it exactly, because there were some great bucks taken last year, which might give a false indication of what's on the landscape going into 2026 and 2027. The cause for concern is that almost the entire fawn crop was wiped out in 2022/2023, and fawns born in 2023 had low survival and poorer body conditions. If we extrapolate that out, fawns born in the spring of 2024 would be 2.5 going into the fall hunts of 2026. Based on what I'm hearing, there are good numbers of younger bucks, but there are fewer of the 4-6 year old bucks still on the landscape. It's likely that we won't see better numbers of older age class bucks until 2027 and 2028. In saying that, there were some great bucks taken last year, but like I said, I am not sure that perception of what 2026 produced is going to be a continued reality moving into this falls hunt. At some point that massive winterkill has to catch up. Will there still be some giant bucks killed this fall? Absolutely, there will be, and it will most likely come from folks who have ample time and intel to scout, hunt, and be selective. It could be worth burning your points, I just don't anticipate it being an easy hunt to find and kill a great buck.
There are some bright spots throughout the state in regards to trophy potential. The downside to those is that those units have low draw odds and require a lot of points to draw. Units 128, 101, 102, 87, and 130 still offer great late-season hunts where lucky license holders will have a chance to look at a number of bucks. Other units that produce some great bucks — just not the number of the top-tier hunts — might be Units 89, 90, 141, 81, 78, and 34. There are also a handful of others, but the hunts listed above currently represent the best trophy options unless you have ample time to scout and hunt.
As noted previously in this article, the cost of a nonresident preference point for mule deer is increasing to $75 going into 2027. That, coupled with unknown factors like drought and winterkill events that we seem to be experiencing more regularly, doesn't make me feel great about the future opportunities to hunt Wyoming for mule deer. If you have points, it very well could be worth it to use those to try to hunt sooner than later. There is no doubt that Wyoming and Mother Nature have put hunters in a tough spot who have been building points and dreaming of a great hunt. Do some soul searching, look through the other tables below, and draw odds within your Insider account. There are many hunts that can be drawn with very few points. If you want to hunt deer in Wyoming, there is an opportunity to do so. You’ll need to consider your objectives, review maps, and utilize your Insider filtering tools to find a hunt that meets your goals.
One final note: Wyoming does not offer archery-specific hunts. Applicants that draw a Type 1 or 2 license do have the chance to purchase the archery stamp and hunt during the archery dates. If they have failed to fill their license should they decide to bowhunt, then they can return and hunt with a rifle during the rifle season. While some hunters take advantage of the archery season, there are far fewer hunters in the field during the bowhunt. Where residents can purchase general OTC deer licenses, there is much more pressure in the field during the rifle hunts. I think the bowhunt is an excellent opportunity to extend your season, hunt bucks early when they are still in bachelor herds and in their summer range and patterns.
Wyoming offers both general season hunting and limited quota hunts. Residents can simply purchase the general season deer hunting license OTC and hunt any general season/area in the state. Nonresidents must draw general region licenses. There are no OTC general season deer hunts for nonresidents.
Below, in the tables, you will see the proposed mule deer license quotas for 2023, 2024, 2025, and 2026. If you do not see a unit you were considering, there was no change to the number of licenses that are likely to be offered.
The maximum number of nonresident preference points for deer is 20 going into the 2026 draw.
Wyoming is the best state in the West to hunt antelope, with a population of more than 300,000. The winter of 2022/2023 was tough on antelope herds, and WGFD reacted by cutting licenses significantly going into the next two years. Antelope have rebounded well since, due to the milder temperatures and production and license numbers are increasing significantly. Antelope do commonly produce two fawns — sometimes three — and fawn recruitment over the last few years saw record highs.
Given the fact that there are so many antelope throughout the state, the trophy potential is generally really good. The Wyoming winters are tougher than in more southern states like Arizona and New Mexico so it rarely produces true giants, but there will always be multiple 80”+ bucks taken every year throughout the state. Historically, the best trophy units have been found in I-80 in the south-central portion of the state. Units 58, 60, and 61 have regularly been at the top of the hit list. More recently, the 90’s units: 90, 91, 92, and 96 have also produced some great bucks. There are also pockets of units in the northern portion of the state, like 114, 67, and 68, that will produce bigger bucks. As you review the GOHUNT hit list in the table below, you will see those as well as others that can be good. I have included draw odds, harvest success, and trophy potentials in that table as well. The reality is that antelope bucks will reach mature horn growth by as early as three to four years old and, with so many antelope on the landscape, most units in the state can produce a great buck.
Likely, the most interesting thing about Wyoming antelope in recent years is what the price increase for the special draw has done to draw odds. The $1,200 price tag for those licenses is seemingly too much for many people to pay, and the odds in the special draw have gotten better. Additionally, being able to draw an antelope license as a second choice in the special draw is a real possibility now. I have included a table later in this article calling out some of the best options to be drawn as a second choice. Remember that drawing a license as a second choice allows you to still buy a preference point in the summer and you would retain any points that you already have. This is a great way to still go hunting while building points for a better unit/hunt in the future. In saying that, there is no question that $1,200 is a lot of money for an antelope license, but it’s still cheaper than almost every landowner tag or guided hunt in every state. Personally, I think it’s worth considering and doing some research.
The last note I would touch on in regards to Wyoming antelope hunts is that the draw odds are very closely tied in most cases to the amount of public land that is available in the unit. The easier the access is and the more public land, the more difficult the license is to draw. This can seem like a deterrent to applying for easier to draw units and rightly so, but there are units that have public and state land that can be hunted if you are willing to hike or do some research to gain access to those parcels. Also, remember that corner crossing is a possibility now, public to public. Additionally, Wyoming has ample amounts of walk-in access areas, which are private lands that you can hunt as part of a state program. You can find more information on the WGFD hunt planner website. Walk-in access areas may require permission and have designated rules and dates to hunt, but with some research and planning, there are large parcels of land where you can hunt in easy-to-draw areas.
One other note: the Wyoming Commission recently approved an increase in the cost of nonresident preference points effective in 2027. The cost of an antelope preference point will be $75 when that changes. In my opinion, it makes sense to find a hunt that you can draw with the number of points you have before those costs increase, and while populations and licenses are increasing.
Overall, Wyoming antelope hunting is a great opportunity, and I think it should be a part of your annual application strategy. The populations are generally robust, trophy potential is good, and it offers a fun, fast-paced hunt with the opportunity to look over a lot of bucks.
Below, I have included hunts that had some chance of being drawn as a second choice in the draw. Note that there are almost no hunts that could have been drawn as a second choice in the nonresident regular draw pool. There are many options for applicants willing to apply in the special draw and pay the higher cost for the license. Almost all of those are only available in the special draw. Remember that if you draw a hunt as a second choice, you will retain any preference points that you have accrued and be able to purchase a preference point this year. If you are considering some of these hunts as a second choice, look at the table below. Be aware that some of these hunts are limited in the amount of public land in the unit, and access to it can be difficult. Before you apply for one of these hunts as a second choice, make sure you have done ample research to ensure that you can find a place to hunt and can access those areas.
The maximum number of nonresident preference points for antelope is 20 going into the 2026 draw.
Unsuccessful applicants will not automatically be given a preference point after the draw. You must purchase a point during the point only time frame, which is July 1 to Nov. 2, 2026.
There are some season date changes and license allocation changes for 2026. Review the Wyoming regulations or the tables within this article for further details on the hunts you are considering.
You can apply for deer and antelope now.
The deadline to apply is June 1, 2026, by 11:59 p.m. MT.
Apply online here. Applications are only accepted online.
Draw results will be available on June 18, 2026.
Applicants must front the entire cost of the permit(s) they apply for plus application and a 2.5% processing fee.
Refunds for unsuccessful applicants will be returned to the credit card that was used.
Wyoming has a modified preference point system for nonresident full priced deer and antelope applicants. A portion of the licenses are allocated to high preference point applicants and the rest are randomly allocated in a drawing.
A youth that is 11 may apply for a preference point if the youth turns 12 in the same calendar year as the application for a preference point is made.
Wyoming has no point system for resident deer and antelope applicants.
The preference point only purchase period is from July 1 to Nov. 2, 2026.
Failure to apply or purchase a preference point for two consecutive years will cause all previous points accumulated to be purged.
You cannot return a deer or antelope license for a refund or get preference points back if you successfully draw.
Deer and antelope hunt areas have different boundaries.


