


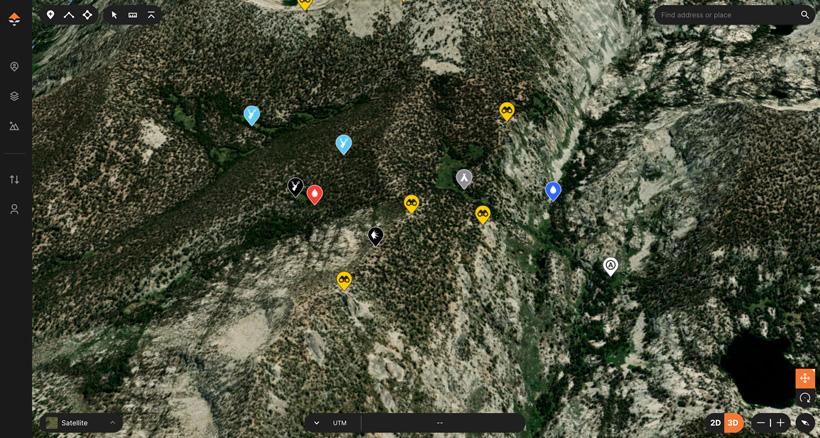
I feel color coding your hunting waypoints to visually see your mapping research is paramount to successful hunts and e-scouting endeavors.
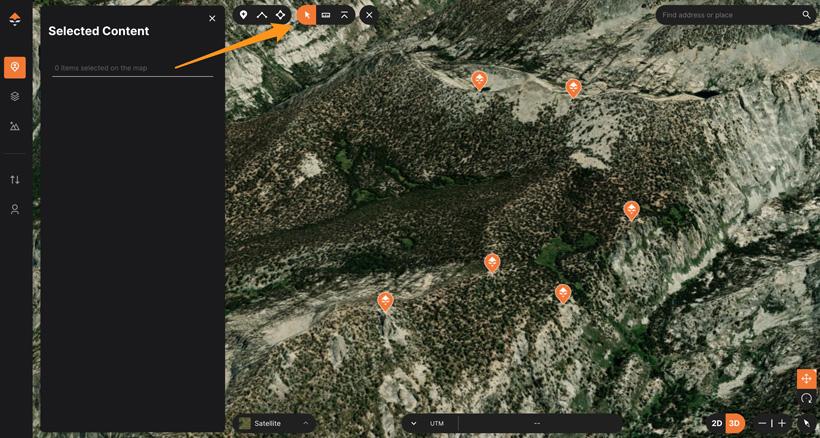
Selecting the bulk edit tool to quickly change the color and icon.
When it comes to maps and e-scouting, part of the research and hunt process is keeping your data organized. That can be through waypoint colors, waypoint icons, hunt folders, and waypoint names.
This hunting waypoint organization process is sort of like spring cleaning. You’ve been stuck inside all winter, and you’re itching to do some offseason prep for the upcoming season. So... one of the best ways to prepare for your upcoming season is by doing some waypoint organization. I’ll even say that this step is even more essential to complete before you go on your next summer scouting trip. The best part... you can easily organize your waypoints directly on GOHUNT Maps mobile app or on the web version and all your efforts will automatically sync across devices.
I have a certain method I developed for color-coding the waypoints I drop when I’m in the field or during e-scouting that I feel really benefits my overall e-scouting/mapping research work.
You can 100% color code your waypoints/features however you want. This is just what works for me. All I suggest is that you find what works for you and stick to it. That way your color-coding process just becomes natural.
Below is an example of my most commonly used waypoints all color-coded with the correct icons. As you can see, when you use a color-coding system; you'll be able to tell what each waypoint means from a quick glance. This is way better in my opinion than a bunch of waypoints all with the same color and icon.
One way to keep track of this color-coding theme is to drop it in the notes of one of your Hunt folders on GOHUNT Maps or create a note on your phone, or an email draft to yourself. Just be sure to label your note so that you can search for it on your computer or phone.
If you're on your computer e-scouting or organizing your waypoint library, you can quickly bulk-edit your waypoints.
For this example, let's say you have many waypoints that you know are all glassing waypoints.
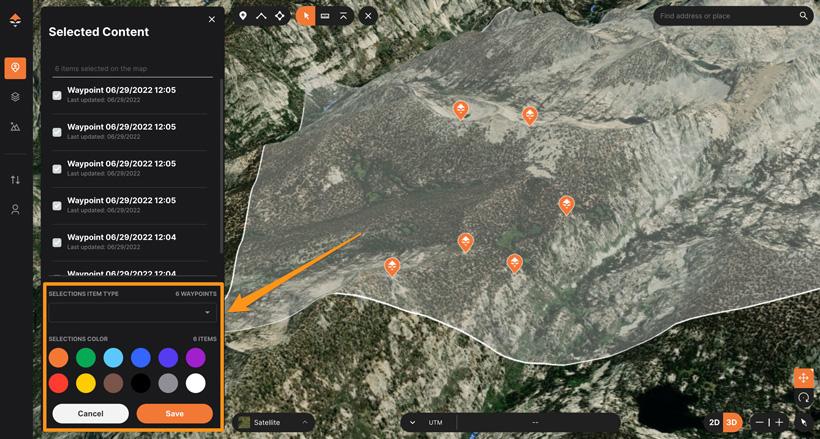
On the web version of GOHUNT Maps, simply select our bulk edit tool which is the arrow in the upper-left portion of your screen on a computer.
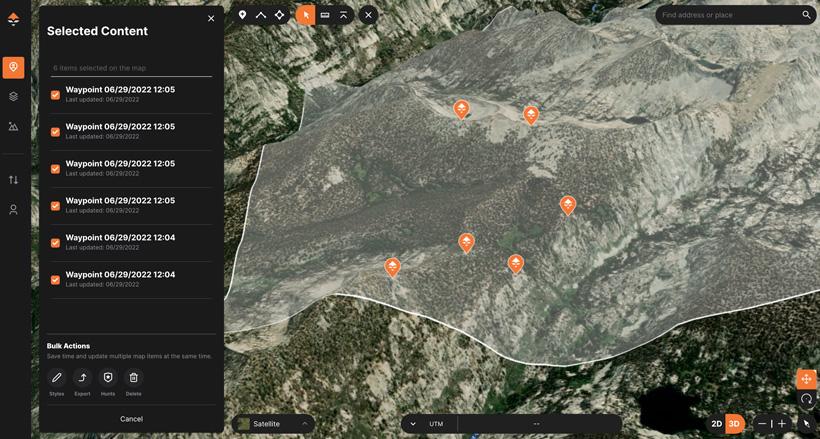
Then click and draw a box around the waypoints you want to bulk edit.
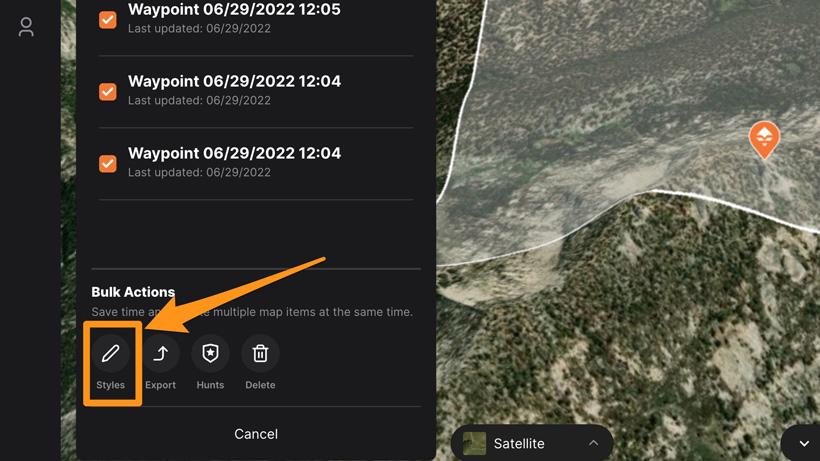
Next, under the bottom left navigation box, click on "Styles" in the "Bulk Actions" area.
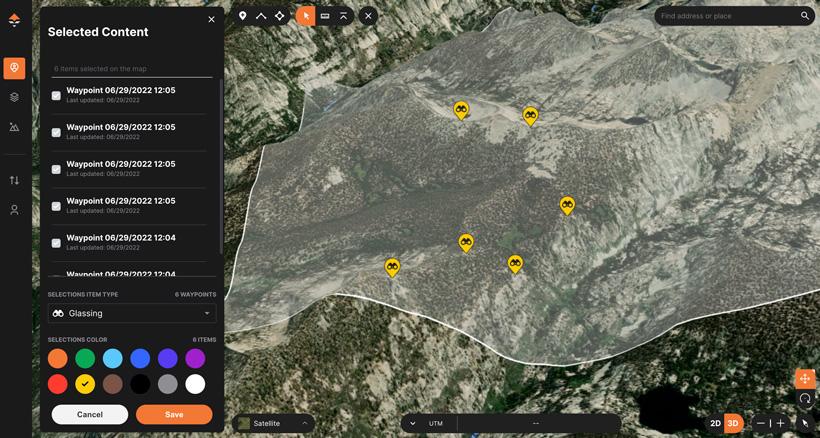
You can now select the correct waypoint icon using the dropdown and then select the color you want for all the waypoints selected.
You'll see I made all my glassing waypoints yellow, and I changed the icons to the glassing symbol. Once that is done, just click Save.
Waypoint naming is also very important. If you have a bunch of waypoints or features that just have a nondescriptive name... down the road, when you go on your hunt, you won't remember what that waypoint means. You can use whatever naming format you like. I prefer to keep it fairly simple by just renaming the beginning part of the waypoint and keeping the timestamp at the end of the name.
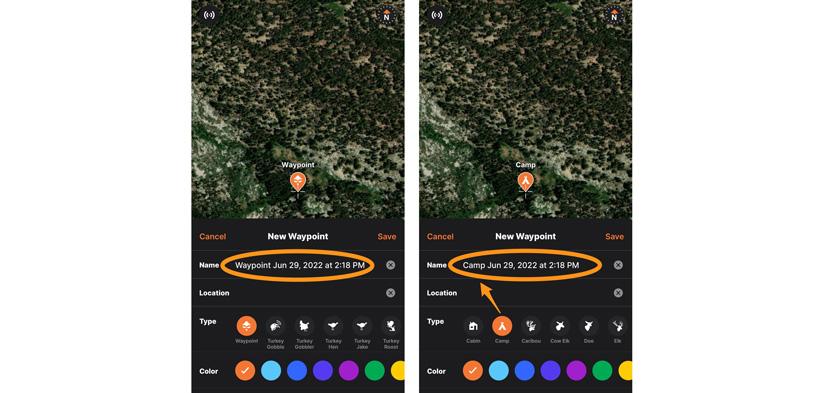
As I already mentioned, I typically rename all my waypoints so I will remember what they are. If you want to save time when re-naming your waypoints in the field, you can just tap the waypoint icon and the default waypoint icon name will show up.
Example:
I find an awesome camp spot when I’m summer scouting and I want to mark it for later reference.
Instead of the waypoint automatically generating the name of “Waypoint Jun 29, 2022 at 2:18 PM” if I tap on the camp icon, it will not only switch the default waypoint icon to the camp icon, but it will automatically change the waypoint name to “Camp Jun 29, 2022 at 2:18 PM”. What that does is save time when you're in the field. Sometimes, when hiking, I like to quickly drop a waypoint of something I see, and using this method really helps me save time and stay organized.
Another part of your hunting waypoint/feature organization is adding your content to Hunt folders. This helps you stay organized, and a Hunt folder can be used in numerous ways.
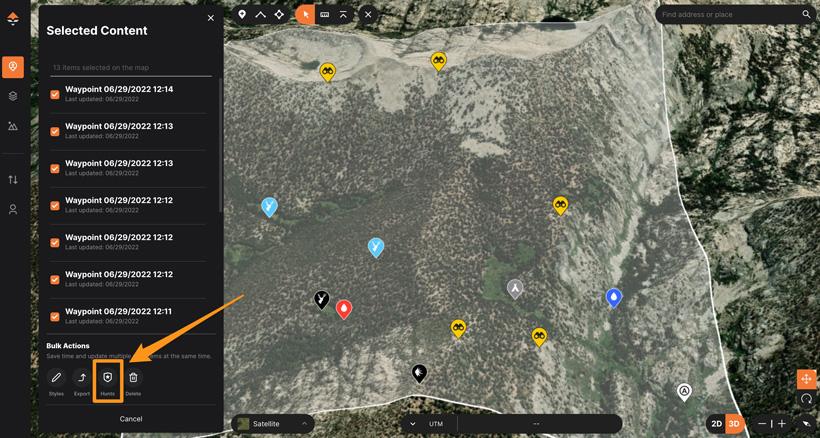
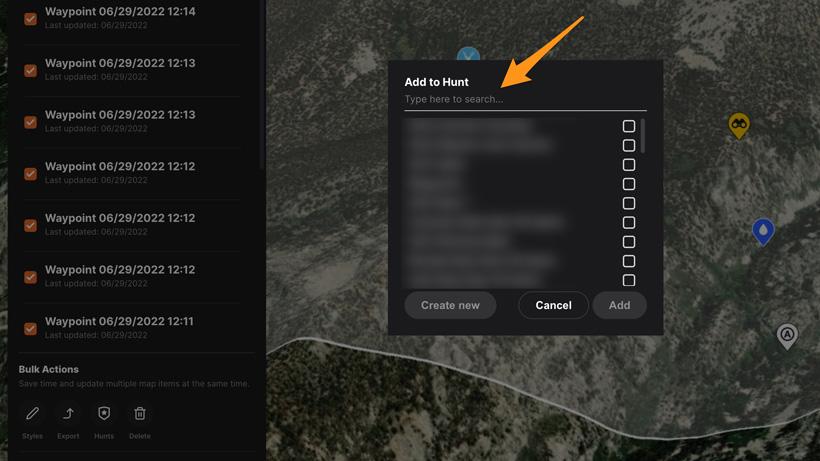
If you've never added your waypoints, lines, polygons, tracks, etc to a Hunt Folder before. You can again use the Bulk Select tool. Then, under the "Bulk Actions" section of the toolbar, select "Hunts."
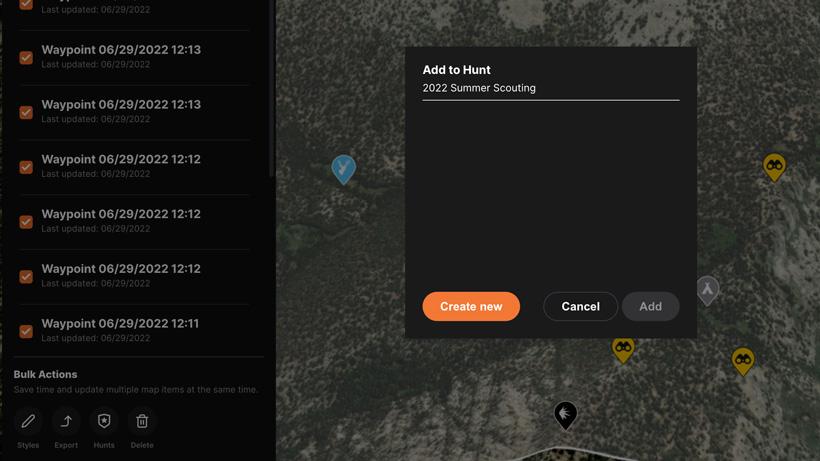
If you already have a Hunt folder created, simply just select it and click add. If you haven't added a Hunt folder yet, at the top where it says "Type here to search" start typing in the name for your new Hunt Folder.
You'll notice that when you start typing in a name, the orange "Create new" button appears. Once you're finished naming your Hunt folder. Click "Create New" and then click "Create" on the next screen that shows up.
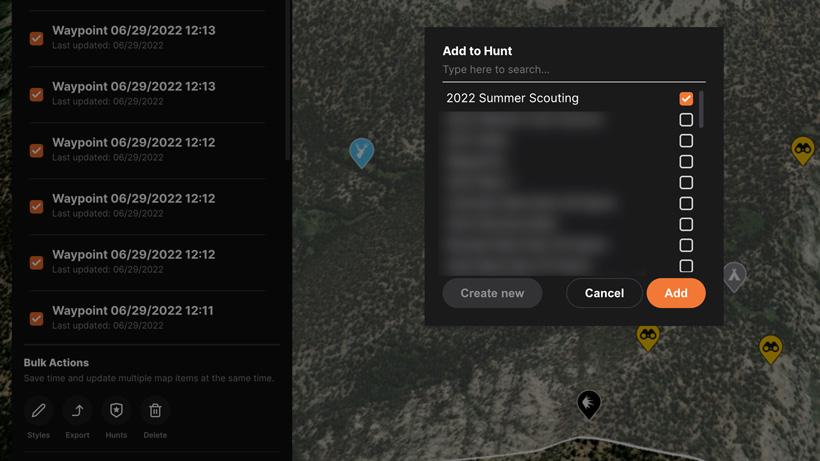
Now you'll see your Hunt Folder is added. Simply click on the check box and click "Add" and all the waypoints you have selected will be added to this folder.
Another part of the organization process is keeping your waypoints added to the correct Hunt folder while you e-scout or even while you're actively hunting.
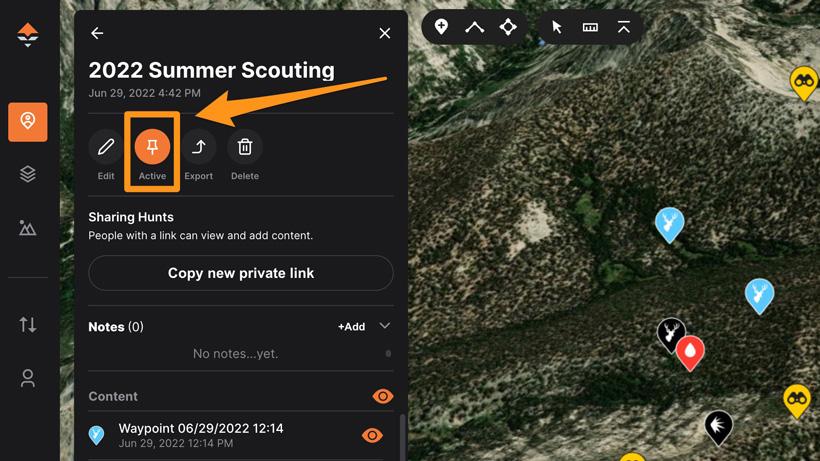
Our "Pin to active Hunt Folder" feature makes this process easy. When you enable it, every waypoint, line, track, etc., will automatically go into that folder.
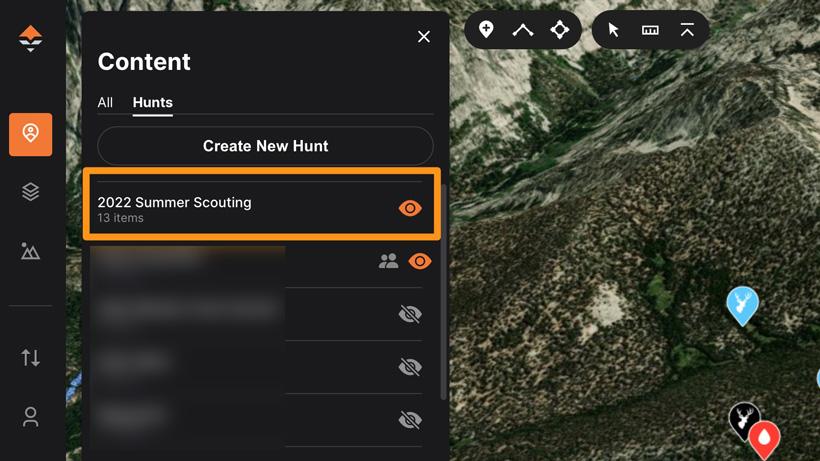
If you go to the Content section and then click on "Hunts" you'll see the following screen. Click into the Hunt folder that you want to pin as active.
At the top, there will be an Active button. Click on it to make it orange. Now, every waypoint or feature you create will automatically go into this Hunt folder.
Note: You can also create new Hunt Folders and pin an active Hunt Folder on the mobile app.
If you need a walk-through on importing your waypoints to GOHUNT Maps, learn more at the link below:
Keeping your data organized is a very easy process. The more you stay on top of it, the easier it will become.
This article was originally published on June 29, 2022, and has been updated.
Color coding waypoints and the importance
Bulk edit trick
Waypoint naming, a shortcut and the importance
How to add your waypoints to Hunt folders
Pinning a hunt folder for faster e-scouting research
One - The more organized you’ll be, the more prepared you are for future hunts.
Two - If you start your personal system of organizing your waypoints, it will become a habit that will continue once you’re in the field during the scouting or hunting season. This will then save time after a scouting or hunting trip.
Three - This organization strategy I’ve been doing for years helps me plan out hunts a lot easier and I can easily see trends in my data for how I hunt, where the animals are located in what types of terrain, and I can also start to fine-tune pieces of the hunting puzzle.
Yellow = Glassing when e-scouting (use the correct symbol)
I will change these icons to Blue with a glassing symbol when I know they are solid spots based on boots on the ground scouting or hunting efforts
Black = Shot and killed animal location (use the correct animal symbol)
Light blue = Animal sighting (use correct animal symbol)
I will mark the exact location on the mountain/hillside where the animal was
White = anything to do with navigation
Access, trails, parked truck, ATV, turns (use the correct icon)
Gray = camp
Blue = water icon
Red = blood